Service Air Freight
Service Air Freight
This table is used in the operational modules.
It is mandatory if you wish to create a File and Booking using this Service Code, and you define a lot of default settings used when operating the system.
In the left column you can see the existing services. GBL is a standard created by the system.
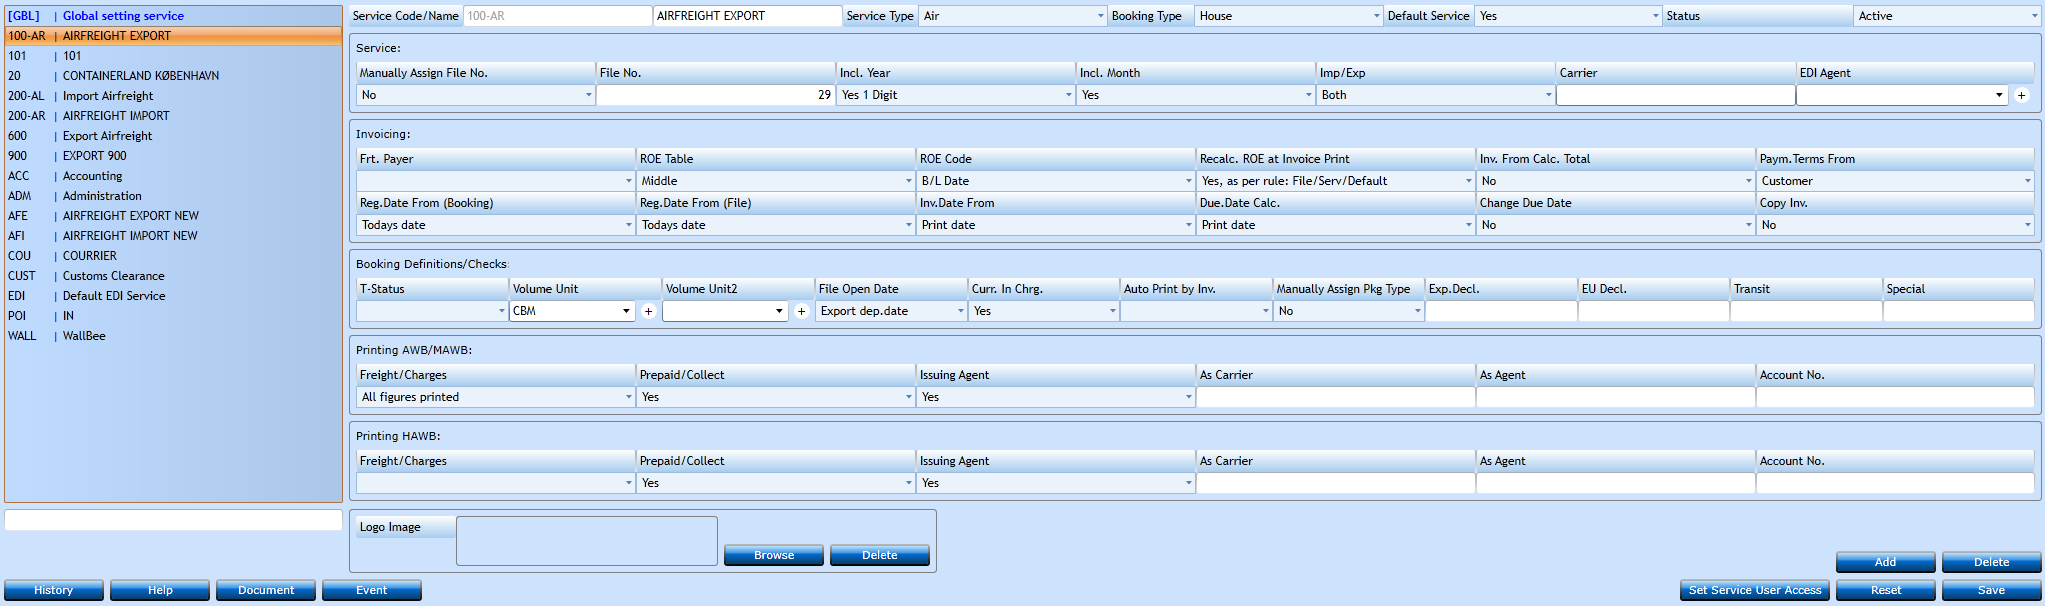
If you wish to enter a new service press the Add-button [F2].
|
Insert a Code for the Service, followed by a longer text (Name). |
||
|
Choose Type of Service for the Service Code. |
||
|
Booking Type |
Choose Default Booking Type. |
|
|
Indicate if this shall be the default. |
||
|
If set to No it cannot be used, but it is not deleted from the system. |
||
|
Indicate if the system shall assign next available number when creating a File. If No then you have to insert a new File No. when creating a File. |
||
|
Insert the next available File No. for the system to assign automatically. |
||
|
If you wish the system to add the year as prefix to the File No. select Yes. |
||
|
If you wish the system to add the month in the prefix of the File No. select Yes. |
||
|
Indicate if the Service is an Import, Export or Transit service. If it is a mix you can also choose to leave it empty. |
||
|
Carrier |
Insert Default Carrier for the Service |
|
|
If the Service is linked to an operation where you exchange EDI it is possible to insert the Code for the EDI Agent in this field. Codes are created in the Code File EDI Agent. |
||
|
When creating a new Service you can apply the rules from the [GBL] settings by checking this box in service Global Setting Service. |
||

In the next section you can set defaults for the system when issuing invoices.
|
Freight Payer will be set as default receiver in the Invoice. |
|
|
When Rates of Exchange are used in the Invoice the system will pick the ROE from the ROE table. You can choose between Middle, Sales, Purchase or Middle and Sales rounded up. |
|
|
This Code is used to determine at which Date the Rate of Exchange shall be selected in the ROE table. Values are:
|
|
|
When creating the File you can add Rates of Exchange which the system uses when converting currencies. But these can be changed before invoice is printed. If you choose No in Recalculation the system will not make a new check on the Rates of Exchange before issuing the Invoice. Setting it to Yes (Recommended) will do this. The last option - Invoice Date will always pick the Rates of Exchange from the Invoice Date when the Invoice is printed. |
|
|
Values Yes or No. If you select Yes then the rates you have inserted under Freight Charges in the Booking will be inserted automatically in the Invoice on the Booking. |
|
|
Here you indicate if the Terms of Payment should be inserted directly in the Invoice or calculated from the data inserted in the Customer table. |
|
|
Choose a Date used as the Bookings Registration Date. This is used as Registration Date which can calculate the Invoice Date. All these choices are from the Booking apart from Today's Date. |
|
|
Choose a Date used as the Files Registration Date. This is used as Registration Date which can calculate the Invoice Date. |
|
|
Select if the Invoice Date should be same as the Registration Date, or simply the Invoice Print Date. |
|
|
Select if the Due Date shall be calculated from the Invoice Date or the Registration Date. |
|
|
Choose if it shall be possible to amend the Due Date manually. |
|
|
If Invoices shall be copied when a Booking is copied then select Yes in this field. |

|
Set the default T-status for the customs documents. |
|
|
Select the default Volume Unit from the drop-down list. If none exists you can insert using the "+". |
|
|
Select which Date shall determine the File Open Date. The File Open Date decides in which period the profit of the files shall be reported. |
|
|
Decide if it is allowed to amend the Currency Code after a Charge has been selected for invoicing. |
|
|
Decide if the system shall automatically print the Arrival and/or Release Note when printing the Invoice. |
|
|
Choose if it is allowed by the user to insert Type of Packages manually in the Booking, or if it shall be selected from a drop-down list in the Code File Packages Types. |

In this block you can insert default values for print in the Direct (IATA) or Master AWB.
|
Set the default value for printing charges in the AWB. |
|
|
Select the value for Prepaid or Collect. |
|
|
Set the default value for printing the Issuing Agent in the AWB or not. |
|
|
Free text field for the Name of the Carrier. |
|
|
Free text field for the Name of the Agent. |
|
|
Free text field for the Account No. |

And a block for defaults to the House.
|
Set the default value for printing charges in the AWB. |
|
|
Select the value for Prepaid or Collect. |
|
|
Set the default value for printing the Issuing Agent in the AWB or not. |
|
|
Free text field for the Name of the Carrier. |
|
|
Free text field for the Name of the Agent. |
|
|
Free text field for the Account No. |

The Logo Image are for a logo used in service. Maximum width: 240 pixels. Maximum height: 80 pixels.
You can also insert a logo in the Branch tab and in Company File.
Logo Logic:
If no logo in Service or Branch – use Company.
If no logo in Service, but in Branch and Company - use Branch.
If logo in Service and in Branch and in Company - use Service.

Press Save [F8] or continue to insert new information pressing Add [F2]. If you regret the input you can press Reset.