Payment Registration
Payment Registration
This program is used for manual registration of incoming/outgoing payments, balancing as well as finance postings.
Date and period are selected/modified and item number will be allocated automatically by pressing Enter/Tab. If you have created separate counter for payments and finance postings you can select the correct counter in item type. If you are posting the opening balances in a new system the period must be for instance 2200, as the period number 00 is the opening period. Date should then be 01-01-2022. Thereafter you are selecting the type Finance and postings can be made.
Possibilities for payment registrations are:
Invoice payment:
This action assumes that you know the invoice number you shall pay. The cursor continues to the invoice number field. Complete this and the rest will be inserted automatically. Press the button ”Save Customer” in the bottom of the screen. If you want to continue with another payment press “New Customer”. Now you can select the same or another type. Using this method will post all the payment on the same item number.
When you have finished to post payments on this item number, push the Finance-button. Check that the nominal postings are correct and save. Now you can continue with the next item.
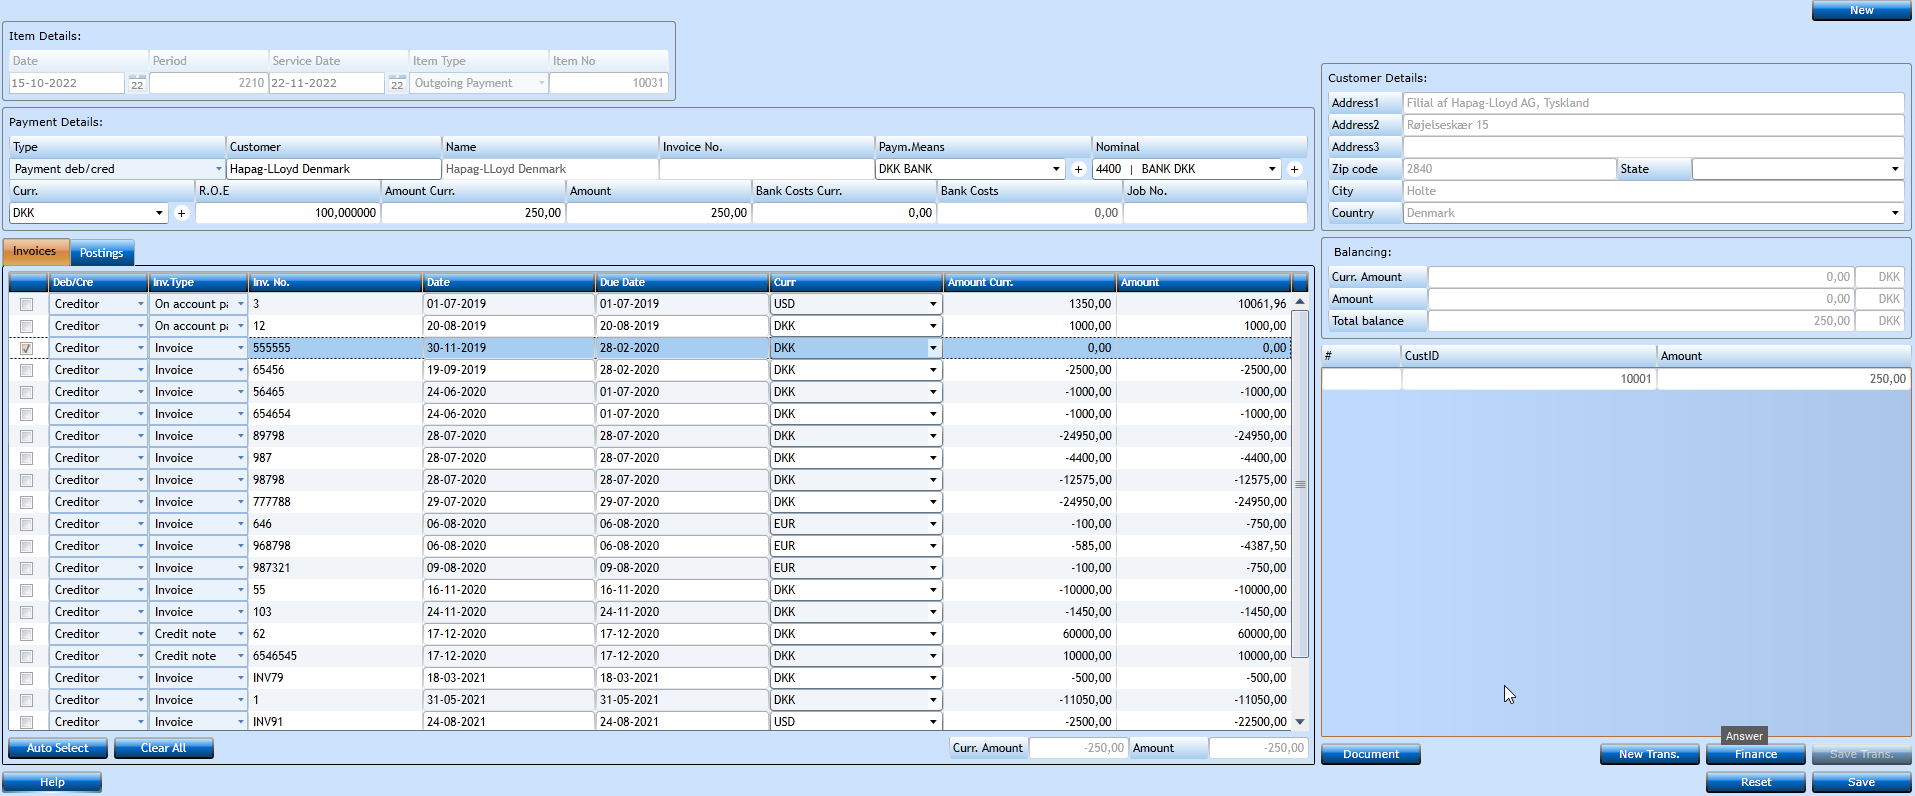
Payment debtor/creditor - Payment debtor - Payment creditor:
If one of these types is chosen, you must register the customer number/name. After the selection of currency, the open invoices will be displayed at the bottom of the screen. If you have chosen debtor/creditor, both debtor and creditor invoices will be displayed which make it possible to set-off own invoices. If payment creditor is chosen only open creditor invoices are displayed.
In the field Currency Amount you are recording the total amount in currency. Notice that you have to manually register whether it shall be posted in debit or credit (- ahead by payment from debtor). This amount gets converted to the company’s Basic currency in the next field. If the exchange rate is not accurate, you can key in the basic currency amount, and the rate of exchange will automatically get adjusted. In the next field you can fill in bank costs.
Now the open invoices will get checked (indicated) after the balance method, meaning that the system will attempt to settle the invoices from behind as far as possible. Remaining amount will be posted on the last invoice. If you wish to modify this suggestion, you can change this by removing the check marks to other invoices. When the balancing is 0, push the button “Save Customer”, and you can continue to New Customer or to Finance.
On account debtor/on account creditor:
If you not at the present can adjudicate which invoices the payment should cover, you can record an on account in- or down payment. Customer’s number must be selected, and the system automatically allocates the item number in the invoice number field, and hereafter you can key in individual text.
Currency code and rate of exchange must be selected/corrected and amount be registered (keep the sign +/- in mind). After banking costs, carry on to ”Save Customer” and New payment can be registered.
Settle debtor/creditor – Settle debtor – Settle creditor.
When you are getting aware which invoices the on account payment should settle, you are choosing this type. After choosing customer and currency, all open items are displayed at the bottom of the screen. Now simply mark the items that shall settle each other, and when the balance is 0, push the “Save Customer”, and new payments can be recorded. Please note that you can also use this type to clear invoices against credit notes.
Invoice debtor/ invoice creditor:
In this program you can also register internal debtor or creditor invoices that do not have to be printed out. Registration is the same as for on account payments, only add the VAT-code.
When the item registration is finished, presses the button ”Finance” and the nominal posting window appears. Remember to control the field Total assets at the bottom to the left, before you are pressing the Finance button, as you are not able to go backwards.
Finance window:
If you choose the type Finance at the beginning of the registration, you move directly to the finance-posting screen. Here you can simply key in the nominal numbers, booking number, service, file, activity and / or branch, depending on the parameters defined on the specific nominal, and the amounts debit or credit. Thereafter select one or several counter nominal(s) is registered until the balance is 0.
Notice that the posting period is shown.
Option for upload of related documents available - drag/drop function