File
File
In Ocean the File is considered as the Profit Center of this/these shipments moving together. It can represent a Vessel or a Voyage with multiple bookings/containers,
or a Consolidated Container moving on a Master B/L and multiple House B/Ls.
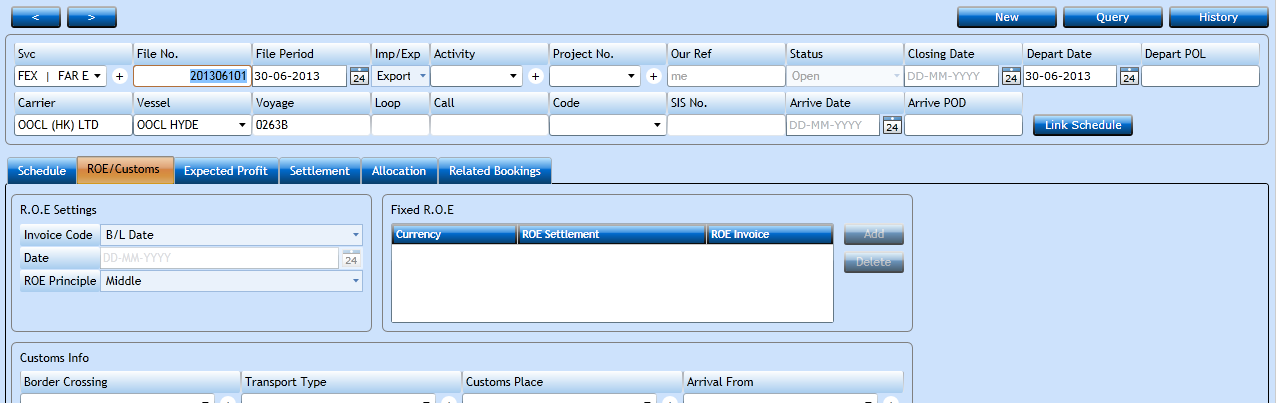
Press the New-button in order to insert a new File.

|
The Service will default to the one linked to your profile. You can change by selecting a valid Service from the drop-down list. |
|
|
The combination of Service and File No. must be a unique reference - only existing once. You can either assign the number manually, or let the system auto-assign. If you wish to auto-assign please refer to the settings in the Service Register. |
|
|
The Period indicates which month the profit/loss of the file should affect. The system will default to Today's Date, but you can amend this manually using the Calendar-button or simply type over. |
|
|
The Import or Export indicator will be inserted a the default from the Service Register. Again you can amend manually. |
|
|
The Activity will default to the Activity linked to your profile. You can change by selecting a valid value from the Activity Register. |
|
|
If you work with Projects you can select the Project No. via the drop-down list. |
|
|
Will default to the user logged on when creating the File. Can be amended manually. |
|
|
The status will default to Open, but will be changed by the system once Closed, Reopened and Finished. |
|
|
Closing the File is made once there are no further Revenue or Costs to be posted onto the File. You can Close a File pressing the Close-button below the File. |
|
|
Insert the Date of Departure (Exports) or Date of Arrival (Imports). You can do this using the Calendar-button or simply type the Date. |
|
|
If you do not use the Schedule function described below you can insert a single Port by typing the Name or start of it. |
In the next line you insert some vessel specific details.

|
Insert the Carrier if needed. You may start typing the Name and a list of valid names will be displayed. |
|
|
You can type the Name manually, or select from the Vessel Register if this has been established. |
|
|
Insert the Voyage No. |
|
|
If you wish to insert a full Schedule, but do not have this in the system, you can add a Loop schedule which will insert the ports and transit times, and you just insert the Sailing Date to update the full Schedule. |
|
|
Insert the Vessel Call Sign. If you inserted the Vessel Name from the Vessel Register this field will be inserted from there - if filled in. |
|
|
Insert the Vessel Code. If you inserted the Vessel Name from the Vessel Register this field will be inserted from there - if filled in. |
|
|
The SIS No. is used by some ports to identify this specific Vessel/Voyage for customs documents. |
|
|
Insert the Date of Arrival using the Calendar-button. |
|
|
Insert the Port of Arrival. Simply start typing the Name and the system will display a list of valid names to choose from. |
For the Link Schedule-button please see below description.
Schedule tab-sheet
You can insert a Schedule in the File. When connecting a Booking then the dates will be inserted in the Booking from here.
The system can also check you do not book to a Port of Discharge which does not exist in the Schedule.

Vessel Loop Schedule
You can create some Master schedules under Vessel Loop schedule which contain the data reused. This Loop Schedule can then be linked to the File so you do not have to insert all details to get a valid Schedule.
In the File press the Link Schedule-button.

|
Select Loop from the drop-down list. |
|
|
System will default to the Carrier in the File. If empty insert the Carrier which Loop is created. Simply type the Name and the system will display a list. |
Then press Search.
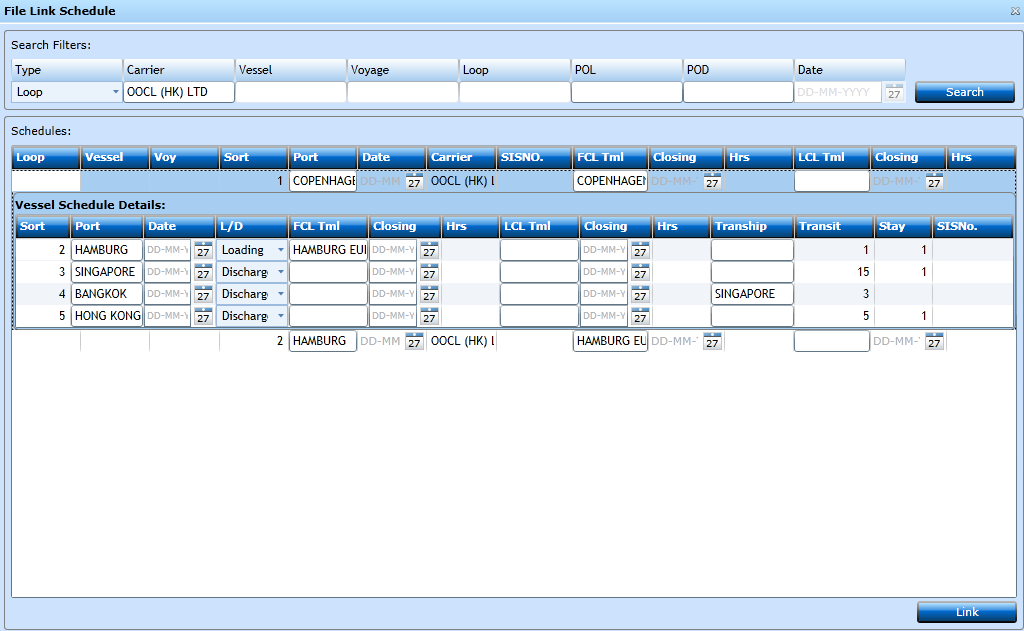
The system will list available schedules. Select the one you wish and press Link.
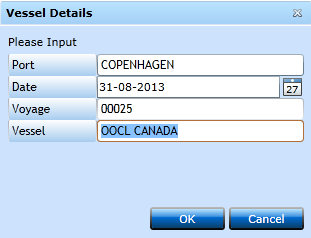
Now insert the first Port of Loading and the Loading Date together with Voyage and Vessel and press OK.
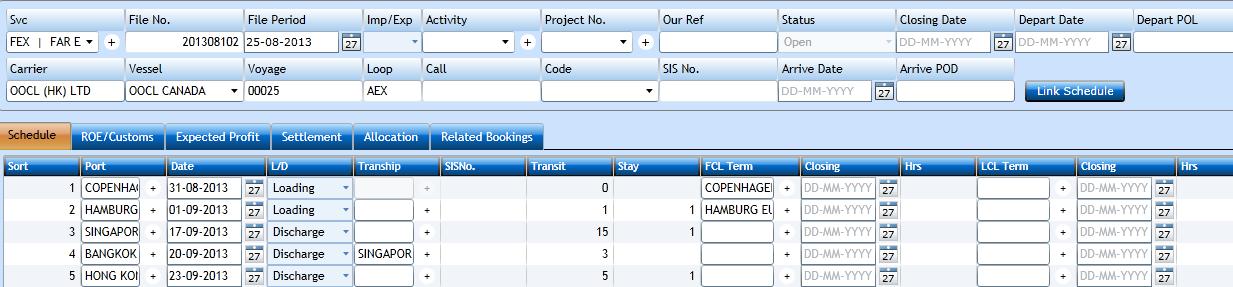
The Schedule is complete. Press Save [F8] to update the File.
Manual Insertion of the Schedule
If you want to create the schedule manually press the Add-button in the lower right corner. A new line will open for inserting.
|
A Sequence No. assigned by the system. |
|
|
Select a Port from the drop-down list. These are located in the Code File Locations and you can create a new pressing the "+". |
|
|
Insert the Date of Loading/Date of Discharge. |
|
|
Indicate if this is a Loading Port or Discharge Port. |
|
|
If the port is being transshipped insert the port it is transshipped via. |
|
|
This number is used bu the German ports for their operation and is not mandatory to get the schedule working. |
|
|
Insert the number of sailing days from the previous port. In the first it will be 0. |
|
|
Insert the number of days the vessel will stay at the port. |
|
|
Insert the Terminal where the Vessel calls. Type the Name and the system will display a list of valid names from the Container Locations. |
|
|
Select a Closing Date using the Calender-button. |
|
|
Insert Closing Hour - four digits with no separator - like 0600 or 2200. |
|
|
As for FCL you can insert the LCL terminal as well. This is also located in the Container Locations. |
|
|
Select Closing for LCL using the Calendar-button. |
|
|
Insert Closing Hour - four digits with no separator - like 0600 or 2200. |
Press Add [F2] to insert the next one, however now do not insert the Date. Press Save [F8] when no more ports should be added.
An example could look like this.

Now press the Update-button.

The remaining dates are now calculated and inserted. Press save [F8].
ROE/Customs tab-sheet
In the tab-sheet you maintain the Rates of Exchange as well as inserting customs information common to all bookings in the File.
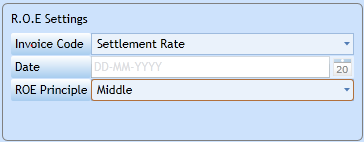
In this block the basic ROE principles will be set. They default from the settings in the Service Register.
|
This Code is used to determine at which Date the Rate of Exchange shall be selected in the ROE table. Values are:
|
|
|
This field will open you choose Type Date in the Invoice Code above. Then you can enter the Date from where the Rates of Exchange shall be selected. |
|
|
If the Invoice Code has been selected as B/L or Type Date(s) then the system will check the ROE table for the values, however there are 3 values per Currency in this register - Middle, Purchase, Sales. You need to select which value should be chosen. |
In the Fixed ROE block you can insert exchange rates manually - If Invoice Code = Settlement Rate.
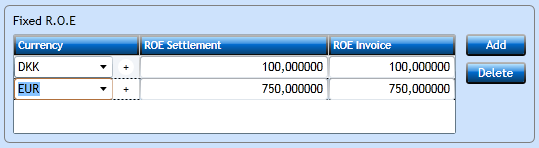
Press the Add-button to insert new Rates of Exchange.
|
Choose a valid Currency from the drop-down list from the list of value in the Currencies table. |
|
|
Settlement ROE is used for Liner Agents when creating settlements to the carriers, but this value is also used if you work with estimates and need to insert an estimate in the Booking. |
|
|
When the values are inserted in this column, these will be used when issuing invoices from all bookings dispatched to this File. |
In the last block we have customs information which should be common to the bookings in this File.

|
Border Crossing |
Select a valid Code from the drop-down list displaying values from the Border Codes table. |
|
Transport Type |
Select a valid Code from the drop-down list displaying values from the Transport Type table. |
|
Customs Place |
Select a valid Code from the drop-down list displaying values from the Customs Place table. |
|
Arrival From |
select a valid Code from the drop-down list displaying values from the Languages table. |
Expected Profit tab-sheet
If a File is not ready at the deadline for reporting the profit/loss it is possible to leave the File open. If the File is open the profit/loss of this File will not appear in the Accounting Reports - unless you insert an
Expected Profit for the File.
You can do this pressing the Add-button [F2].

In the Grp. column you select if you are going to report Expected Income (Revenue) or Expected Costs. The system will automatically fill in the Nominal and highlight fields required.
Insert the required fields and continue to the next line if further figures need to be inserted.

You can add as many lines as you wish, if a detailed expectation is required.
|
Selecting the value for either Revenue or Costs will automatically fill in the text and required Nominal. |
|
|
Will default from the Group Code. |
|
|
The Nominal for posting the Cost will be displayed if the Cost Group is selected. |
|
|
The Nominal for posting the Revenue will be displayed if the Income Group is selected. |
|
|
Will default to the Activity linked to the user creating the Expected Profit. This can be amended manually via the drop-down list. |
|
|
Will default to the Branch linked to the user creating the Expected Profit. This can be amended manually via the drop-down list. |
|
|
If the Costs Group is selected you need to insert the costs in this field. |
|
|
If the Income Group is selected you need to insert the Revenue in this field. |
Settlement tab-sheet
In the Settlement tab you can issue invoices or settlements directly from the File.
Press the New-button to insert a new Settlement or Invoice.

|
Select the Type of Invoice. Valid values are:
|
|
|
If your company policy require a Reason for issuing a Credit Note you must select a valid value when Credit Note is chosen in the previous field. |
|
|
Insert the Name of the Company you wish to issue the Settlement/Invoice for. Start typing the Name and the system will display valid values from the Code File Customer File. |
|
|
If you are creating an Internal Invoice the Service Code is required. Select a valid Code from the drop-down list. |
|
|
If you are creating an Internal Invoice the File No. is required. Start typing the File No. and the system will display a list of valid files. |
|
|
The Invoice Total will be calculated into this Currency. It will be inserted default from the Customer, but can be amended manually by selecting a valid value from the drop-down list. |
|
|
Will display the Rate of Exchange linked to the Currency. Can be amended manually. |
|
|
Default will be inserted from the Customer File, but can be amended - if company policy allows. |
|
|
Will be automatically inserted once the Invoice is printed. |
When above is ready press the Add Item-button. Now you can add the Invoice lines and charges.


Depending on the creation of the charges the system will now insert the default values from the selected Charge. You can amend each field manually if needed.
Please refer to the Charges Calculation Type section for explanation of the setup.
Press the Add Item-button to insert another line if needed, or OK to return to the Invoice header. While in the Invoice tab sheet press the Print-button and the Invoice will be printed.
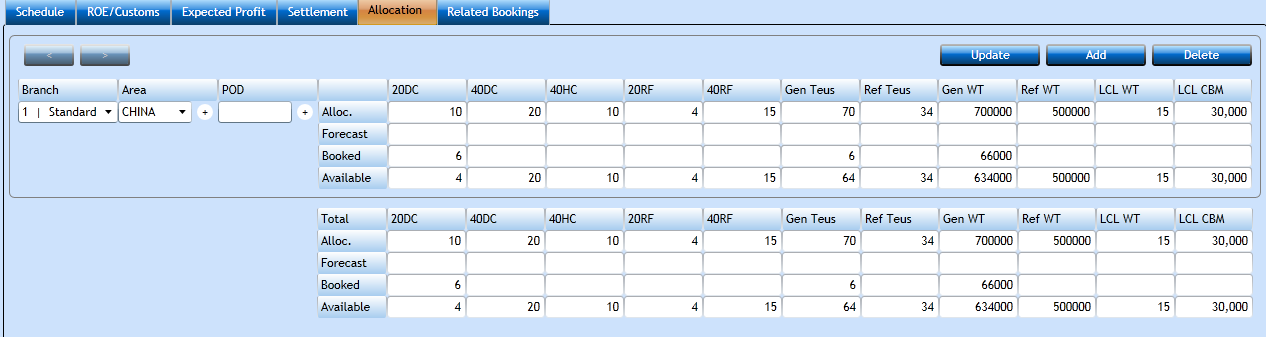
Allocation tab-sheet
In the Allocation tab you can maintain and control the space you have been allocated on this Voyage.
The Allocation can be separated into Branch, Area and/or Port Of Discharge.
Press the Add-button to insert a new allocation. If you have more than one allocation you can shift between them pressing the  .
.
The Grand Total will be shown in the lower block.
|
Select the Branch for which the allocation shall be inserted. |
|
|
If Area is used select from the drop-down list displaying values from the Areas table. |
|
|
If the POD is used insert the Name of the Port. Start typing the Name, and the system will display a list of valid ports. |
|
|
In the allocation line you insert the allocated space. |
|
|
In this line you insert you the figure you expect to book. |
|
|
Will reflect the actual booked cargo |
|
|
Will display Allocation minus booked. |
Related Bookings tab-sheet
In the last tab sheet you can get a brief look at the bookings in this File, and you can select one and press Open Booking to view it.
