Company
Company
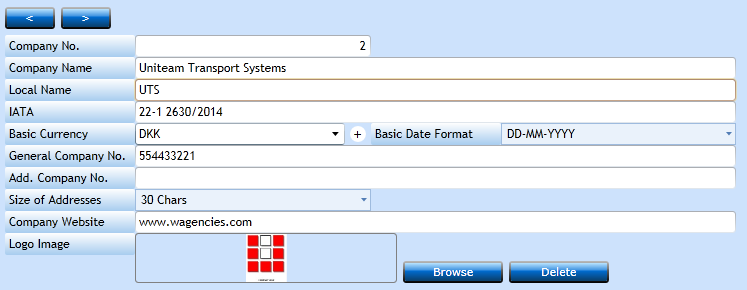
The Company in Uniteam is a legal Company with its unique Registration No. Under this Company No. you will report the profit/loss to the authorities.
Apart from this there is a number of settings deciding how the system shall work in multiple operations and we will go through them one by one.
When you open the program the system will display the Company from your default settings. If you wish to change use the  or
or
simply insert the Company No. and press tab.
|
Insert the legal Name of the Company. |
|
|
If needed insert the Name in local language here. |
|
|
For Approved IATA members insert the IATA No. here. |
|
|
Select the Currency of the Company in which the accounts shall be reported. The drop-down list will display values from the Currencies Register. |
|
|
Set the Date Format used in the system. |
|
|
Insert the Company Registration No. - VAT number. |
|
|
In case you have an Export VAT No. insert this here. |
|
|
Define how long the Customer Address is allowed to be. Maximum is 60 characters but this is not necessarily good in all cases, since there may be limited space in some documents, and some EDI Exchange may not support this. |
|
|
Company Website |
Insert the homepage of the Company. |
|
Logo Image |
Insert the primary logo of the Company, The logo here is used for documents. You can also insert a logo in the Branch tab and in Service. Maximum width: 240 pixels. Maximum height: 80 pixels. Logo Logic:
|
|
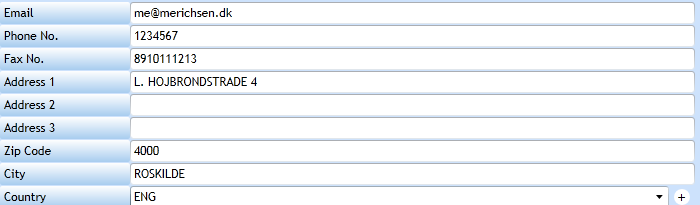
Insert the primary E-mail address of the Company. |
|
|
Insert the primary Phone No. of the Company. |
|
|
Insert the primary Fax No. of the Company. |
|
|
Insert the registered address of the Company. |
|
|
Select the Country in the drop-down list displaying values from the Code File Countries. |
Postings block
|
Insert the Year of the Accounts. |
|
|
Insert the Month No. where the Posting Year will start. January = 01, while April = 04. |
|
|
Indicate if the Previous Posting Year has been finalized. |
|
|
The system will display the last year ended as information. |
|
|
When posting invoices indicate which number should go into the field Reference No. Normally Book. No. but in some cases AWB-No., B/L No., or Container No. may be more useful. You can only select one Reference per Company. |
|
|
Indicate in which level the Customer No. shall be inserted when invoices and/or payments are posted. In reports showing the Customer Name you may wish to choose the lowest level (Invoice and Payment), however in some countries this may be too low as the bank statements show one figure only not a line per Customer. Choosing Invoice & Payment will split the Bank info in Uniteam to Customer level. |
|
|
Posting Allowed Between; |
|
|
If you wish to control the periods for posting Debtor Invoices then insert the allowed period in the From/To Date using the Calender-button. Fields can be left open for posting in all open Posting Years. |
|
|
If you wish to control the periods for posting Creditor Invoices then insert the allowed period in the From/To Date using the Calender-button. Fields can be left open for posting in all open Posting Years. |
|
|
If you wish to control the periods for posting Finance invoices then insert the allowed period in the From/To Date using the Calender-button. Fields can be left open for posting in all open Posting Years. |
|
|
Indicate if it shall be allowed for operational staff to create Debtors directly in the Booking. If Yes then the system will copy the default Terms from Customer No. 1 in the Customer Register. |
|
|
Indicate if allowed to post preliminary invoices to the File. |
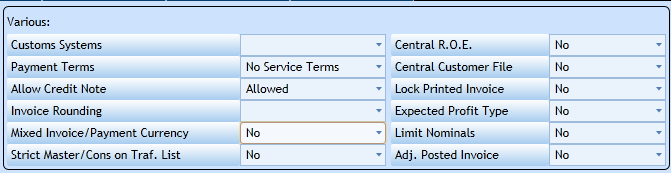
Various block
This block contains a set of triggers used through the system. You may not need all of them.
|
If you exchange data with a Customs System you must indicate which one here. |
|
|
If you use the detailed Payment Terms in the Customer File then you need to select Service before Client. |
|
|
Indicate if it is:
|
|
|
Indicate if you wish Invoice Rounding and to which amount:
|
|
|
Indicate if it is allowed to settle an Invoice in other Currency than the Invoice Currency. |
|
|
Indicate if the Traffic List shall split Invoices in Master level to the Houses or not. |
|
|
If updating the Currency table shall update multiple companies then these must have Yes in this field. |
|
|
If updating the Customer table shall update multiple companies then these must have Yes in this field. This do require a strict policy on Customer ID assignment. |
|
|
Indicate if a printed Invoice shall be locked for amendments even before posting. |
|
|
Indicate if you work with Expected Profit in the File. |
|
|
Indicate if you wish to restrict the user access to posting into the Nominal. If you choose Yes the you need to update the User Maintenance. |
|
|
Indicate if it shall be allowed to adjust a posted Invoice. If Yes then adjusting will trigger a roll-back and a new posting. |
Bank Details tab-sheet
In the Bank Details tab-sheet you insert the details of the bank accounts. The details are used in documents and when sending Payment via EDI to the bank.

|
Select the Currency of the account from the drop-down list displaying values from the Currencies Register. |
|
|
Insert the name of the Bank. |
|
|
Insert the Bank Account No. |
|
|
Insert the IBAN No. if existing. |
|
|
Insert the SWIFT Code. |
|
|
Insert the Nominal No. for this account. |
|
|
Insert the Nominal No. for Bank charges. |
|
|
These fields reserved for identifications when sending exchanging data via EDI. |
|
|
If you do business with the public sector you need an EAN number. Insert here if needed. |
|
|
If the Info system is checked then remarks inserted in the Customer File will be displayed in multiple programs when the name is entered. |

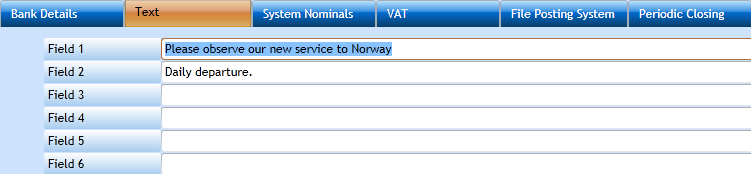
Text tab-sheet
In this tab you can insert information you wish to print in some documents, if built-in, over a specific period.
System Nominals tab-sheet
In this tab sheet you insert some of the nominals the system needs for posting. The Debtor Control and Creditor Control are
mandatory for the system to post revenue and/or costs. Same goes for VAT 1 Nominal which will be the default if no other VAT nominals are specified.

|
Define if the Nominal are for Debtor or Creditor. |
|
|
Select a valid Group from the list displaying valid values from Debtor/Creditor Groups. Select the Standard Group if valid for all. |
|
|
Select the Nominal for the Control Account via the drop-down list displaying values from the Nominal Ledger. |
|
|
Select the Nominal for VAT Code 1. |
|
|
If you operate with different VAT level you can define 9 levels and then insert the Nominal for the Code here. But these are not mandatory. |
Under the Control and VAT Nominal there are 3 block where other default nominals can be inserted.

|
If you have allowed posting of Preliminary Invoices to the File you need a Preliminary A/P Nominal where the A/P part goes until real invoice is received. |
|
|
The Interest Calculation can post the Interest Income to a Preliminary Nominal until paid. Once paid, the amount will be moved to the Interest Income Nominal. If not paid the Invoice can be rolled back. |
|
|
Insert the Nominal used for Periodic Adjustments. |

|
Insert the Nominal for Decimal Adjustments. This can be used in the Automatic Payments program and if you have chosen Round Off in this Company Register. |
|
|
Insert the EU VAT Nominal for Creditor Invoices. |
|
|
Insert the EU VAT Nominal for Debtor Invoices. |
|
Insert the P/L Nominal for the Year End procedure. |
|
|
If you operate with File Posting Periods then insert the Nominal for Year End Sales. This would be for Debtor Invoices having Date in one year and posted to a File (Finalized) having period in another year. |
|
|
If you operate with File Posting Periods then insert the Nominal for Year End Sales. This would be for Creditor Invoices having Date in one year and posted to a File (Finalized) having period in another year. |

VAT tab-sheet
In this tab sheet you must define the various VAT percentages. You will also set some defaults for the VAT calculation.
Under the VAT tab you have 9 VAT codes, an EU VAT code, and 3 reverse charges A to C available. Nominals for the EU VAT code plus A to C reverse charges are setup here and nominals for the 9 VAT code is setup under the System Nominals tab.
|
|
|
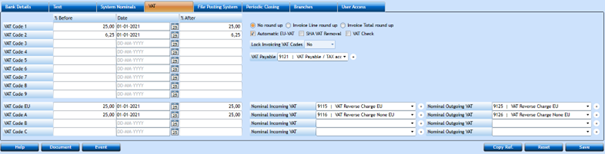
There will be 2 percentages for each Code.
The percentage before last Date of change and after. If there is no VAT in your Country you can leave this tab sheet empty.

|
Will leave the VAT calculation with decimals. |
|
|
Will round the VAT calculation up in each line (Charge) of the Invoice. |
|
|
Will round the VAT calculation up on the total VAT amount of the Invoice. |
|
|
Will insert Debit/Credit posting for each Invoice having EU-VAT. The default nominals are defined in the System Nominals tab. |
|
|
Standard for the system is VAT being calculated on the Nett amount. If this box is checked the system will assume Invoice amount is Gross and then deduct the VAT. |
File Posting System tab-sheet
In this tab you need to define how you wish the system to act in respect of posting the profit/loss of each File.
There are three File Posting Methods and you have to select on in the bottom of the page.

|
When invoices are posted to the File they will go directly to the P/L having Date and period as the Invoice. |
|
|
When invoices are posted to the File they will go to a WIP Balance Nominal with Date and period as the Invoice. Only when the File is Finalized the figures will go to one Nominal in the P/L. |
|
|
When invoices are posted to the File they will go to a WIP Balance Nominal with Date and period as the Invoice. Only when the File is Finalized the figures will go to, at least but not limited to, one Revenue and one Cost Nominal in the P/L. |
If you have chosen Profit or Turnover Method you will need to insert nominals in the table as well.

|
Insert the Nominal used in the charges when posting to a File. This should be a Balance Nominal. |
|
|
Choose the Nominal where the Revenue or Cost shall be inserted when the invoices are posted. |
|
|
If you wish to post difference between Buying ROE and Selling ROE you must insert the Currency Difference Nominal here. This is not required. |
|
|
When the files are finalized the system can split the Revenue and/or Cost onto separate nominals depending on the Debtor/Creditor Group. This is a good feature if you need to report InterCompany Turnover. |
|
|
Select the Debtor/Creditor Group(s) from the drop-down list displaying values from the Debtor/Creditor Groups table. |
|
|
Insert the P/L nominals for the result to be posted when the files are finalized. |
|
|
If you work with Expected Profit then insert the P/L Nominal here. |
|
|
If you work with Expected Profit then insert the Balance Nominal here. |
|
|
If you have open files when performing the year end, you need to insert Expected Profit to get a result in the P/L. When these files are finalized in the new year a Nominal here will then keep the original Expected Profit from last year. This way you can check if the expectation mentioned last year is also correct. |
|
|
When inserting Expected Profit in the files the users use Group to insert correct nominals. |
|
|
Insert a text describing the Group. |
Periodic Closing tab-sheet
In this tab you can close periods thus avoiding posting back in time you do not want. You should be aware that closing a period, really means closing a period.
No one can reopen a closed period, so please consider this options very carefully.

Insert the Period(s) you want to close.
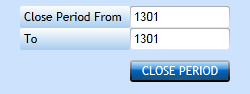
Then Press the Close Period-button.

Now the information is shown in the table. It shows the Period closed, who did it and when it was done.
Branches tab-sheet
In this tab sheet you can create new branches or maintain existing ones data. You can add or remove user access to a Branch as well.

If you wish to add a new Branch press the Add-button [F2] in the left block. You will now be able to add the details.
|
Insert the Branch No. you want for this Branch. |
|
|
Insert the Name of the Branch for international purpose. |
|
|
Insert the Name in local language if needed. |
|
|
If the Branch has a separate IATA No. from the Company you can insert this here. |
|
|
If the Branch has a separate Company Registration No. you can insert here. |
|
|
If the Branch has a separate Additional Company Registration No. you can insert here. |
|
|
Choose the Basic Language Code from the drop-down list. |
|
|
Choose the Local Language Code from the drop-down list. |
|
|
Indicate if this shall be the Default Branch. |
|
|
For a new the Status would be Active, but if a Branch closes down you would not want to delete the history so then you choose Inactive. |
|
|
Branch Website |
Insert the homepage of the Branch. |
|
Branch Logo |
Insert the logo of the Branch. Maximum width: 240 pixels. Maximum height: 80 pixels. You can also insert a logo in th Company File and in Service. Logo Logic:
|
|
Insert the default E-mail address for the Branch. |
|
|
Insert the default Phone No. |
|
|
Insert the default Fax No. |
|
|
Insert the Address of the Branch. |
|
|
Select the Country of the Branch from the list of values displaying values from the Code File Countries. |
Set Branch User Access
If you press the Button  you can grant the users access to this Branch directly in this screen thus avoiding to go to the User Maintenance as well.
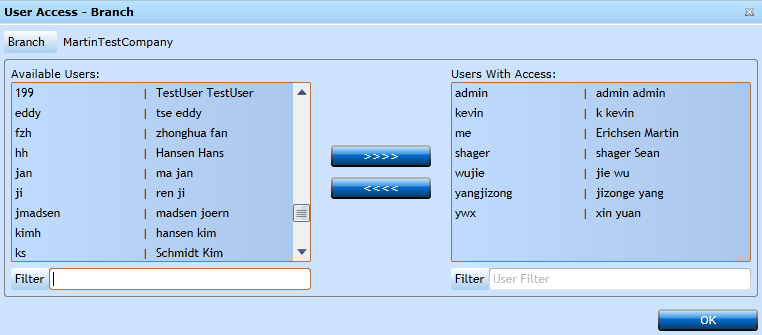
Mark the User in the Available users and press the  and OK.
Remove would be the opposite marking the User in the Users with Access and then pressing the  button.
User Access tab-sheet
In this tab you can grant an Users Access to the Company without updating all profiles in the User Maintenance.
Mark the User in the Available Users and press the and OK.
Remove would be the opposite marking the User in the Users with Access and then pressing the button.