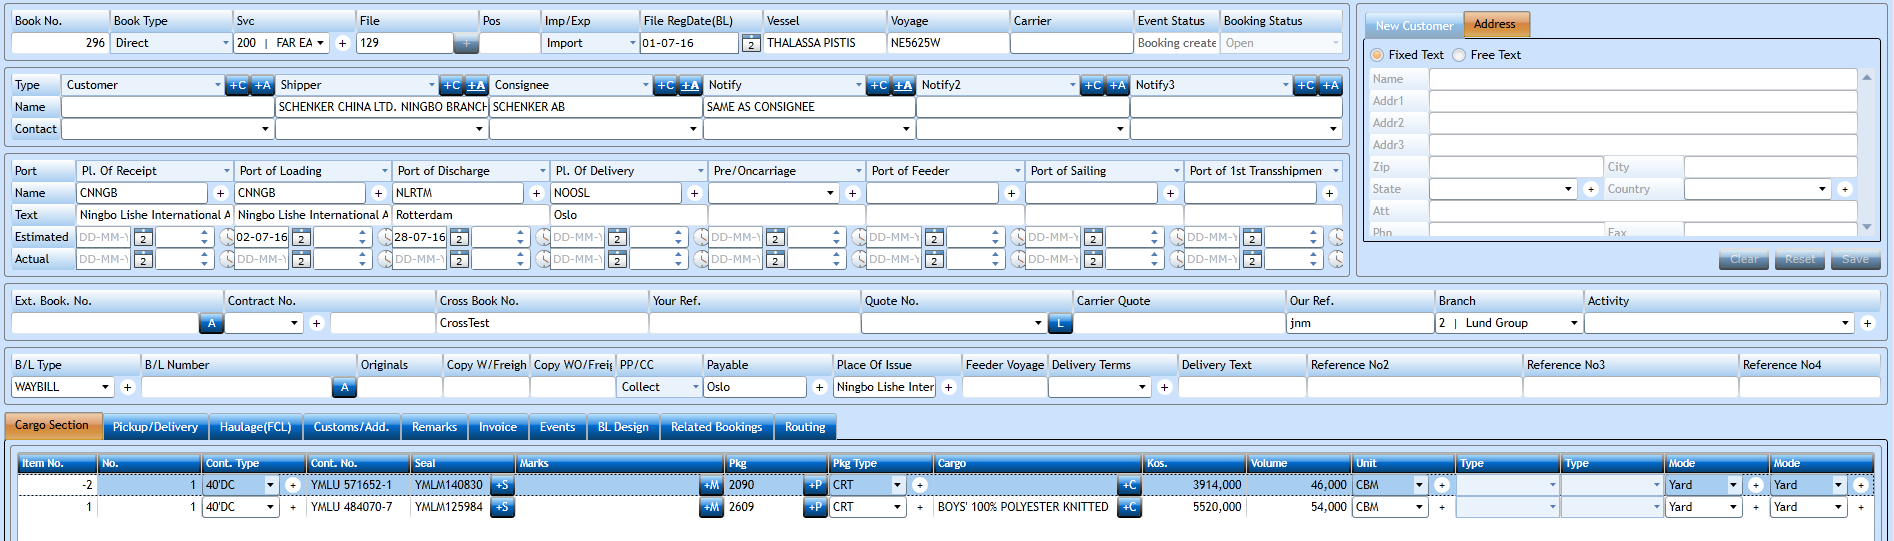
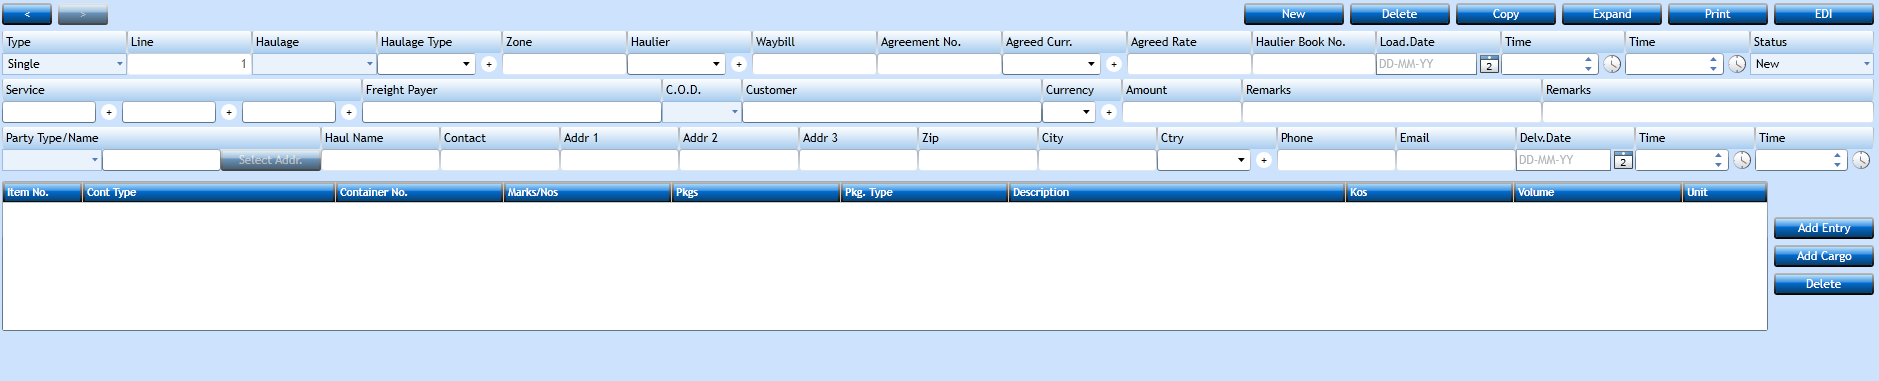
Booking
Booking
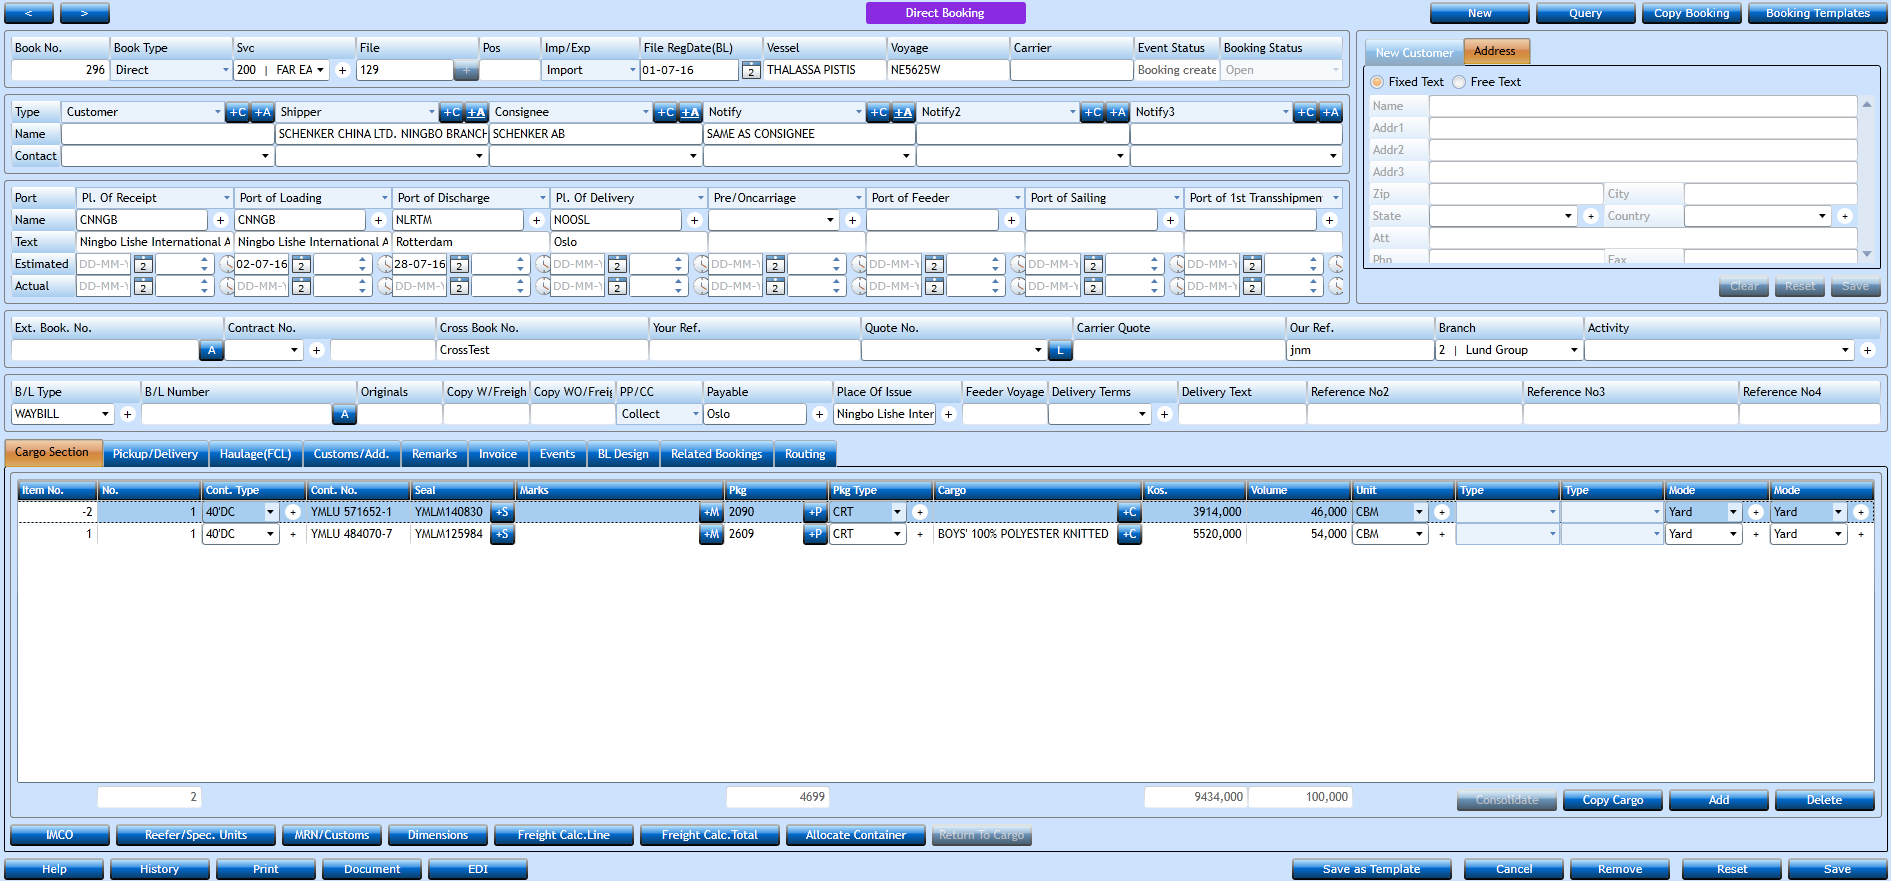
When you open a Booking it will default to the newest inserted. If you need find another Booking simply insert the Booking No. and press tab.

If you want to copy an existing Booking - press Copy Booking. Modify the needed information and press Save [F8].
You can also press the Query-button and a new screen opens for you to insert the Query criteria.

Insert the criteria and press Search or [Ctrl+Shift+S].
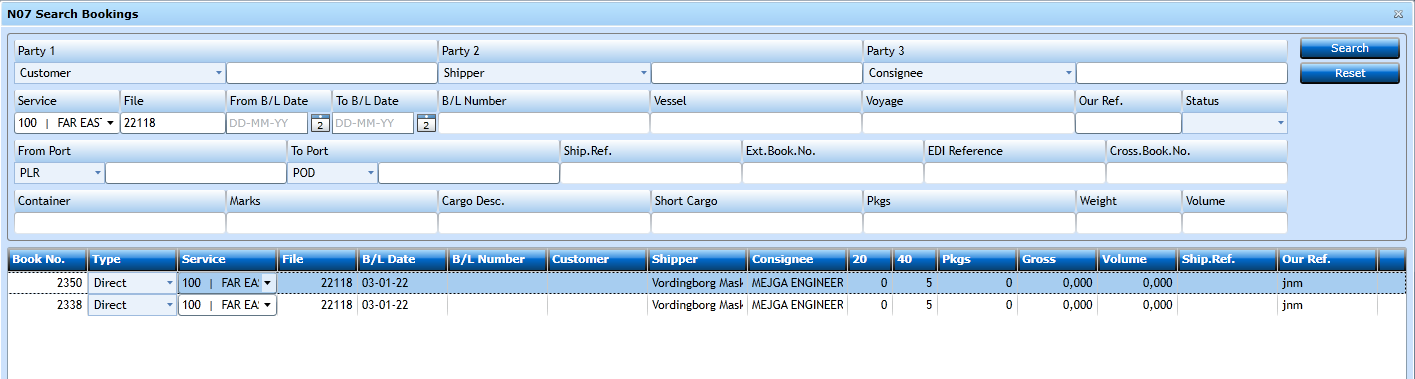
From the list you can mark the Booking you need and open by double-clicking or press OK.
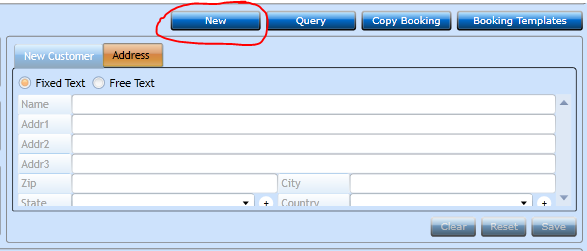
If you want to create a new Booking press the New-button.
If you want to create a template - press Save as Template.
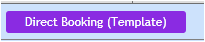
When you have a Booking which will reoccur frequently, you can save it as a template for future use.
The template is a normal Booking, but with a Booking Status (Template) which will be excluded from statistics.
Save a relevant Booking using Save as Template.
If you want to create a new Booking using a template - press Booking Templates.
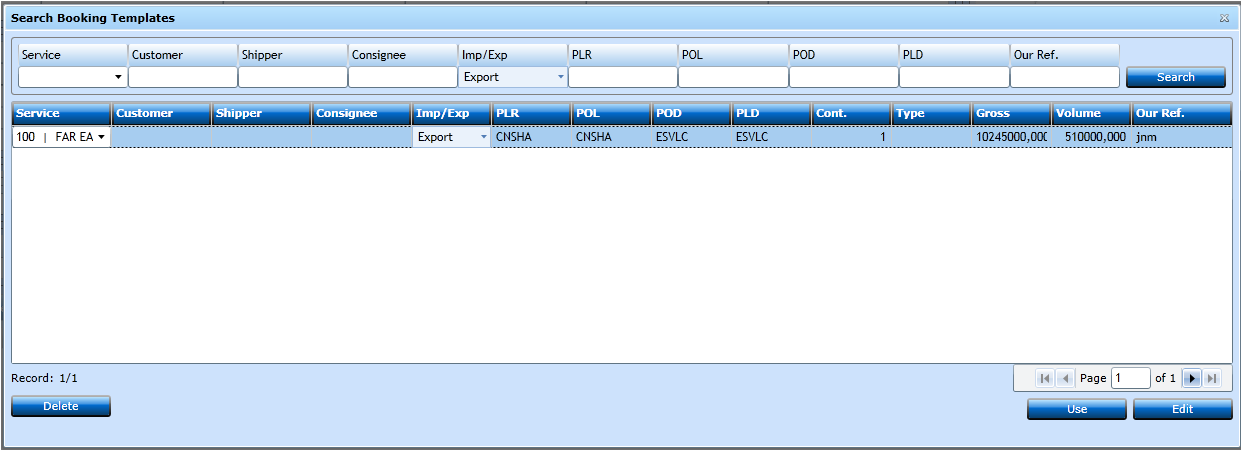
A template in the list can now be converted into a new Booking by clicking the Use-button or you can click the Edit-button to adjust the template.
You are also able to delete a template.
Remember to click on the Save-button [F8] when saving an edited template – not the Save as Template, which will create a new template.
If your set-up uses skinning on required fields, these skin-settings will be skipped in the template and only applied in for the real Booking.
The Booking Type indicator to show as template, when editing a Booking Template.
A field description will follow below.
|
This is a unique reference for this Booking, and will be assigned by the system. You can search an existing Booking very easily by inserting the Booking No. and then tab through. |
|
|
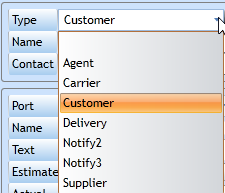
From the drop-down list you can select the Type of Booking you create:
|
|
|
The Service will take the default from the Profile Setting, but you can select another using the drop-down list. Or you can type in the new Service Code using the "+". |
|
|
If you wish to add the Booking to an existing File start entering the File No. and a list of existing files will display. |

If you wish to create a new File press "+" and a new screen will open where you can insert Carrier, Vessel and Opening Date.
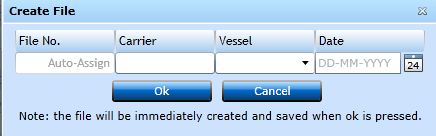
Auto-Assign means the system will generate the next available File No. The rules for the File No. is defined in the Service Register.
|
The Position No. will indicate the number the Booking has on the File. Leave it empty and the system will assign next available. |
|
|
Indicates if the Booking is an Import, Export or Transit shipment. The default is picked from the Service Register, but you can amend if needed. |
|
|
Will default to Today's Date when Booking is created but can be manually amended. |
|
|
Will be inserted from the File if you linked to an existing one, or from the Create File screen above if you created the File in the Booking. |
|
|
Will be inserted from the File if you linked to an existing one. You can also amend/insert manually. |
|
|
Carrier |
Will be inserted from the File if File created in the File function. If created by Create File, this has to be updated manually. |
|
You can set the system up to inform a Booking Status depending on the steps you design the Booking to move in. Setup is made under Event system. |
|
|
Booking Event |
System Booking Event. |
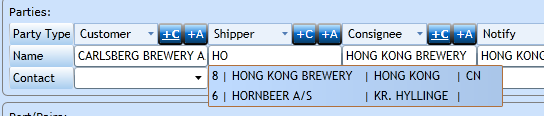
In the Parties block you insert the Customer, Consignee and Notify details.

|
These labels are set by default, but if you need different Party Type you can choose these from the drop-down list. |
|
In the Name field you insert the Name matching the label above. If the name exists in the Customer File you simply start typing the Name or Customer No. and a list of names matching will display. 'Mark the correct one and tab through. |
|
If you have created contact persons under the Customer in the Customer File you can select it from the drop-down list. |
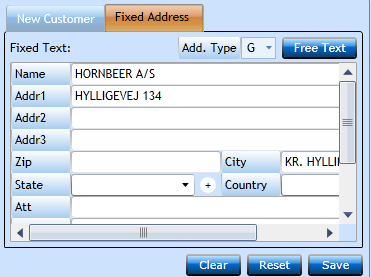
Correcting an address
Once you have inserted an address from the Customer File you can adjust some details if needed. Mark the Customer with the cursor and press the  -button.
This will activate the screen in the right side and you can add and/or amend details.
|
Add.Type |
Is set to default General Name and Address from the Customer File, but you can change to Local or Delivery. |
|
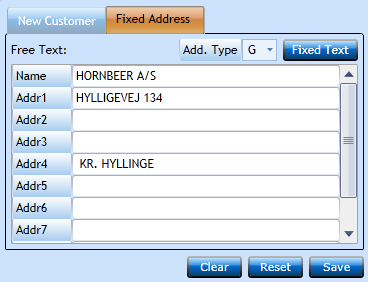
If you press Free Text then the screen will change to simple lines giving additional space for text. When ready Press Save [F8]. |
|
Clear |
Will remove existing text. |
|
Reset |
Will roll back to the text which was before you started editing. |
If the Customer is not existing you can create it by pressing the  -button.
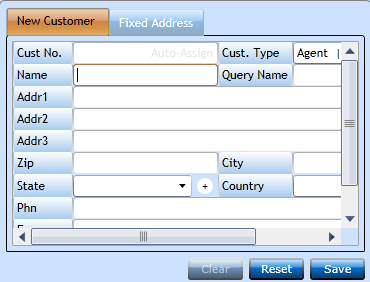
Now you can insert Name and Address. Press the Save-button [F8] and the system will ask if you wish to create Debtor or Address.
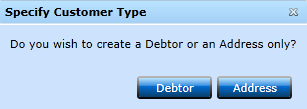
Choose Debtor if you need to create an Invoice to the Customer. Otherwise choose Address.
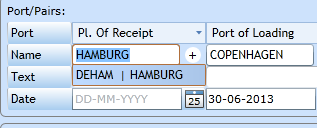
Now we move on to the Port/Pairs block where you can insert ports and dates.

|
The system set the label defaults as shown above, but you can modify if you wish, and also choose extra tabs if needed. |
|
|
Name |
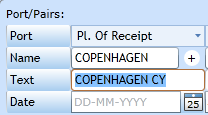
If you start typing the Name or Port Code the system will display a list of matching ports. Mark the correct one and tab through. |
|
If you need to adjust the Name for the B/L you can insert a text here which will replace the Name in the documents printed. |
|
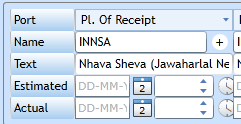
Insert the relevant Date for each port. If you have created a Schedule in the File the system will insert the Date from there. |
|
|
Actual Date and Time |
Insert the relevant Date for each port. Status messages loaded to the system can update this field. |
In the next block there are space for multiple Reference No.
|
Insert the carriers Booking Reference in this field. |
|
|
Here you can insert under which Contract No. the shipment is moving. |
|
|
Additional field for INTTRA contract no |
If you send bookings to INTTRA from Uniteam system, this field is used for Carrier contratc no. |
|
If you book cargo via another agent or v.v., this number is the link between you. |
|
|
Here you insert your Customers Reference. |
|
|
If there is a valid Quote in the Rates Section the system will automatically suggest this when you press Link. |
|
|
Will be returned if in the linked Quote - or you can insert manually. |
|
|
Will default to the user creating the Booking. |
|
|
Will default to the Branch of the user creating the Booking. |
|
|
Will default to the Activity linked to the user creating the Booking. |

In the next block there are space for information on B/L, and payments.
|
B/L Type can be used to decide which B/L No. Counter shall be used. Select a value from the drop-down list from the Code File B/L Type. |
|
|
You can insert a B/L No. manually or press the |
|
|
Default number of originals will be inserted from the Service Register, but can be amended manually. If this is a Sea Waybill then insert 0. |
|
|
Default number of copies with freight details will be inserted from the Service Register, but can be amended manually. |
|
|
Default number of copies without freight details will be inserted from the Service Register, but can be amended manually. |
|
|
Select the value for the Freight Payable Code. Prepaid, Collect or Elsewhere. |
|
|
After selecting the Payable Code the system will insert default value for the place where the freight is payable. This can be amended manually. |
|
|
Place of Issue |
Location where B/L are produced and signed. |
|
Feeder voyage |
Voyage no. for feeder vessel |
|
Delivery Terms |
Terms from Delivery terms table. |
|
Delivery Text |
Location, in free text for combination with Delivery Terms. |
|
Additional Reference field for individual use. |
|
|
Additional Reference field for individual use. |
|
|
Additional Reference field for individual use. |


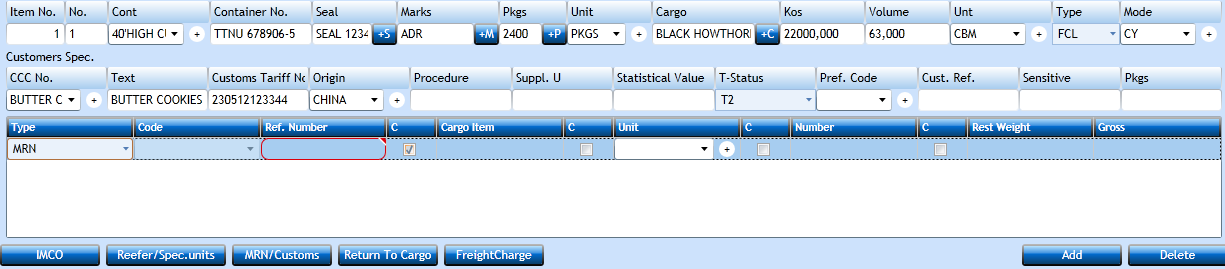
Cargo Section tab-sheet
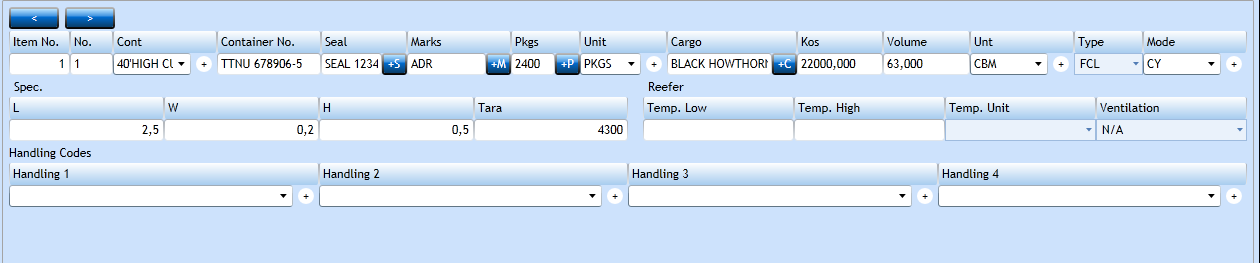
In the Cargo Section we have made it possible to insert the most frequently used information directly in the Cargo Line, while additional information can be inserted pressing the buttons below the Cargo Lines.
when pressing one of these buttons the details will be attached to the Cargo Line highlighted when pressing the button.

Press the Add-button [F2] and a new line will open for input.
|
System will assign the next available number for the Cargo Line. Apart from showing the number of Cargo Lines this number can be used in the Haulage Tab-Sheet. |
|
|
If containers then indicate the number of containers in the Booking. Eventually you will end up having at least 1 Cargo Line per Container, but you can start the Booking just inserting 2 x 20' in 1 line, and 2 x 40' in the next line. |
|
|
If containers select the correct Container Type. These are inserted in the table Container Information. |
|
|
Container No. |
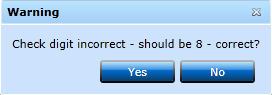
Insert the Container No. The number will be checked against the check digit. If incorrect you will get a notice. |
|
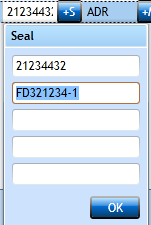
Insert the Seal Number. If there are multiple seal numbers press the Press OK to return to the Cargo Line. |

|
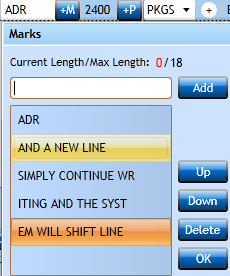
Marks |
Insert the Marks and Numbers for the cargo. If there are multiple Marks and Nos lines press the |

|
Insert the Number of Packages in the Cargo Line. If you need to register Inner Packing for Hazardous Cargo then press |
|
|
Insert the Type of Packing from the drop-down list displaying values from the table Package Types. If you need to control these codes are always used you can set a switch in the Service Register. You need to find the check for Manually Assign Package Type and set this to No. |
|
|
Cargo |
Insert the Cargo Description. If 1 line is not enough press the |


|
Insert the Gross Weight of the cargo in Kilos. Can contain up to 3 digits. |
|
|
Volume |
Insert the measurement in the measure indicated in the Unit field. |
|
Unit |
Insert the Volume Unit. You can select via the drop-down list displaying valid fields from the table Volume Units. |
|
Type |
Select the valid Service Type from the drop-down list. |
|
Type (identical field) |
Select the valid Service Type from the drop-down list. |
|
Mode |
Choose from the drop-down list, or start typing the Name of the Mode (Door, Pier, RoRo, etc.) |
|
Mode (identical field) |
Choose from the drop-down list, or start typing the Name of the Mode (Door, Pier, RoRo, etc.) |
If you need to insert additional information then press the button corresponding to the information you need to add.
IMCO-button
When pressing the IMCO-button the screen will open with the details of the Cargo Position highlighted.

You can shift Cargo Position pressing the  arrows.
The first line will display the details of the Cargo Position you are going to add IMCO details for.
IMCO Page, IMCO Class, EMS and MFAG cannot be amended in this screen. Here you have to amend in the IMCO Register directly. Press the  plus next to the UNNO and the
IMCO Register will open for amending. After you have saved the change reselect the UNNO in the Booking and the field will be updated.
|
Code |
Select the UN No. via the drop-down list displaying valid values from the IMCO Register. |
|
Temp |
Set the temp. |
|
Temp. Unit |
Choose from the drop-down list displaying Fahrenheit or Celsius. |
|
Nett Wt |
Insert the Nett Weight of the goods. |
|
Powder |
Insert weight. |
|
Marine Poll. |
Choose from the drop-down list displaying HAZARDOUS or MARINE POLLUTANT. |
Press Save [F8] when ready.
Press  to get back to the Cargo Position.
Reefer/Spec.units-button
When pressing the Reefer/Spec.units-button the screen will open with the details of the Cargo Position highlighted.
You can shift Cargo Position pressing the arrows.
In the Spec. block you insert dimension of Out Of Gauge Cargo or if the cargo has been stuffed in special Container with over dimensions. Normally the dimensions are inserted in meters.
|
Insert the Length. |
|
|
Insert the Width. |
|
|
Insert the Height. |
|
|
Insert the Weight of the Container. This can be automatically inserted if the field Tare is updated in the table Container Information. |
In the Reefer block you insert Reefer Temperature Settings required for this shipment.

|
Insert the lowest temperature allowed in the reefer during transportation. |
|
|
Insert the highest temperature allowed in the reefer during transportation. |
|
|
Select the corresponding temperature unit from the drop-down list. |
|
|
Indicate the ventilation function selecting a value from the drop-down list. |
In the Handling Codes section you can add codes for special handling - used when exchanging EDI.
Select a valid Code from the table Handling Codes via the drop-down list.
Press Save [F8] when ready.
Press to get back to the Cargo Position.
MRN/Customs-button
In this section you can add Customs Information for each Cargo Position. Information on shipment level will be added in the Customs Info tab-sheet.

When pressing the button the screen will open with the details of the Cargo Position highlighted. You can shift Cargo Position pressing the arrows.
|
Insert a valid Cargo Commodity Code from the drop-down list displaying values from the Commodity Register. |
|
|
Is automatically filled in when the CCC No. is selected. The text displayed is Text 1 from the Commodity Register. |
|
|
Is automatically filled in when the CCC No. is selected. The number displayed is Commodity Code from the Commodity Register. |
|
|
Select the Country of Origin from the drop-down list displaying values from the Code File Countries. |
|
|
Insert the Procedure Code. |
|
|
Insert the value for Supplementary Units if applicable. |
|
|
Insert the value for the Statistical Value of the Cargo. |
|
|
Select the correct T-Status for the shipment. The default is set in the Service Register. |
|
|
Select the Preference Code from the drop-down list displaying valid values from the Code File Preference Codes. |
|
|
This field is reserved for the Customs Reference returned form the customs system. |
|
|
If the Cargo is sensitive then insert the number of sensitive packages. |
|
|
If the Cargo is sensitive then insert the Type of Packing. |
In the next block you can insert additional information required for the customs procedure. Depending on the procedure you can choose between different information.
Press the Add-button [F2] and a new line will open for input.
|
Select the Type of Information you wish to add from the drop-down list. |
|
|
If a Document Code is chosen you need to select a Document Type in the Code field. |
|
|
Insert the Document No. - or if MRN the MRN No. |
|
|
If the MRN is complete check the box and leave the remaining fields empty. |
|
|
Insert the Cargo Item No. for incomplete items in the MRN. |
|
|
At the last cargo item which completes the MRN check the box. |
|
|
If the MRN is not complete insert the number of units included in this line. |
|
|
When the last units in the MRN are sent check the box to indicate the MRN is complete. |
|
|
Insert the remaining Weight of the incomplete MRN. |
|
|
Insert the total Gross Weight. |
Press the Save-button [F8] or Add [F2] if you wish to insert additional customs information.
Press to get back to the Cargo Position.
Freight Calc. Line-button
In this section you can add charges which can be printed in the B/L, Manifest or attached to a Settlement.
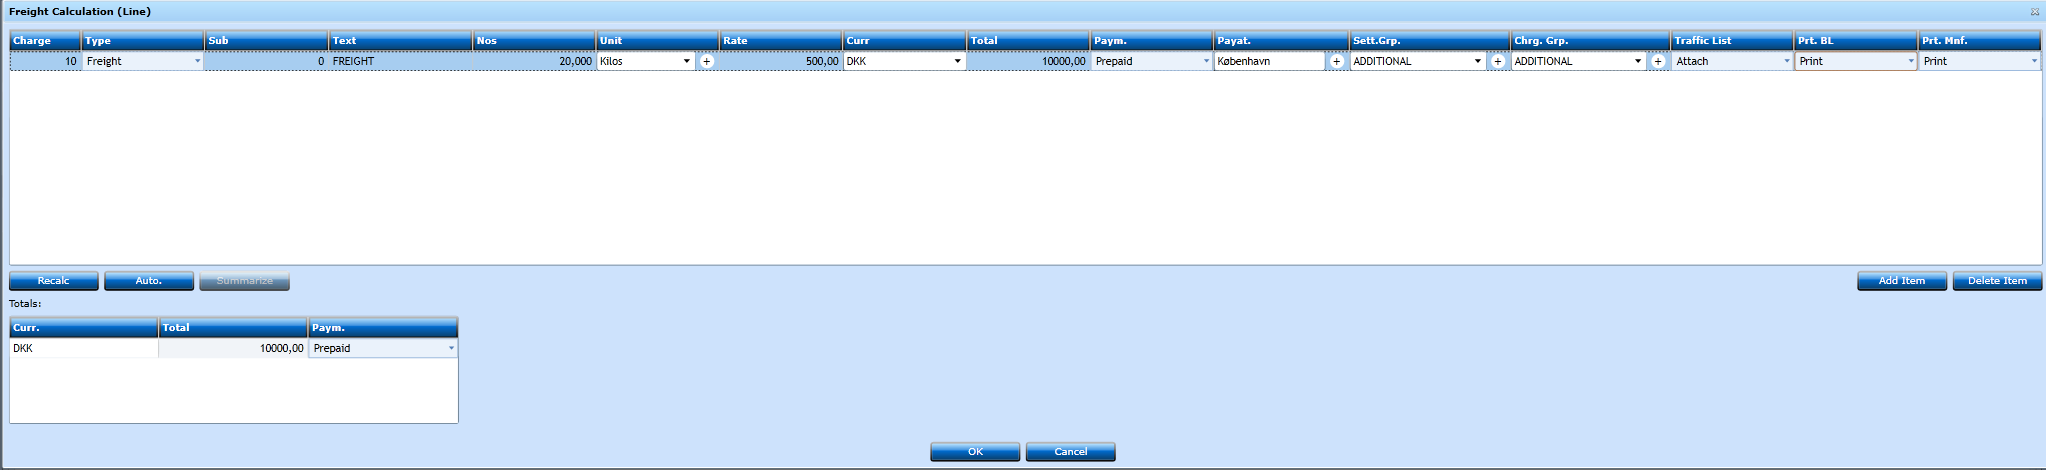
Press the Add-button [F2] and a new line will open for input.
|
Select a valid Charge from the drop-down list displaying valid values from the Charges table. |
|
|
Type |
Choose from the drop-down list, or start typing the Type, and a list of values will display. |
|
Sub |
Will default from the field Subtotal in the Charge. Can be amended manually. |
|
Will default from the field B/L Text in the Charge. Can be amended manually. |
|
|
The system will calculate the number of containers from the Cargo Positions. |
|
|
Unit |
Choose from the drop-down list with available units from the Code File Unit Codes. |
|
Will default from the field Price in the Charge. Can be amended. |
|
|
Will default from the field Curr in the Charge. Can be amended. |
|
|
The system multiplying Nos Rate. |
|
|
Will default from the field Pay. Code in the Charge. Can be amended. |
|
|
Indicate where the freight is payable be selecting a valid Code. |
|
|
Will default from the field Settl. Grp in the Charge. Can be amended. |
|
|
Choose from the drop-down list with available values. If you want to create new Charge Groups press "+". |
|
|
Choose from the drop-down list with available values - Print, Summarize, None. |
|
|
Choose from the drop-down list with available values - Print, Summarize, None. |
|
|
Choose from the drop-down list with available values - Print, Summarize, None. |
Add as many charges you need pressing the Add Item-button [F2].
Below the charges you see 3 buttons.

|
Recalc |
Will be used if you change some of the rates and other calculations are depending on these rates. Pressing Recalc will then do a complete recalculation of all lines so you do not have to reinsert these. |
|
Auto. |
If you have linked a Quote with a Costs Section then pressing Auto will insert these charges from the Quote Cost Part. |
|
Summarize. |
Has no function at this moment. |
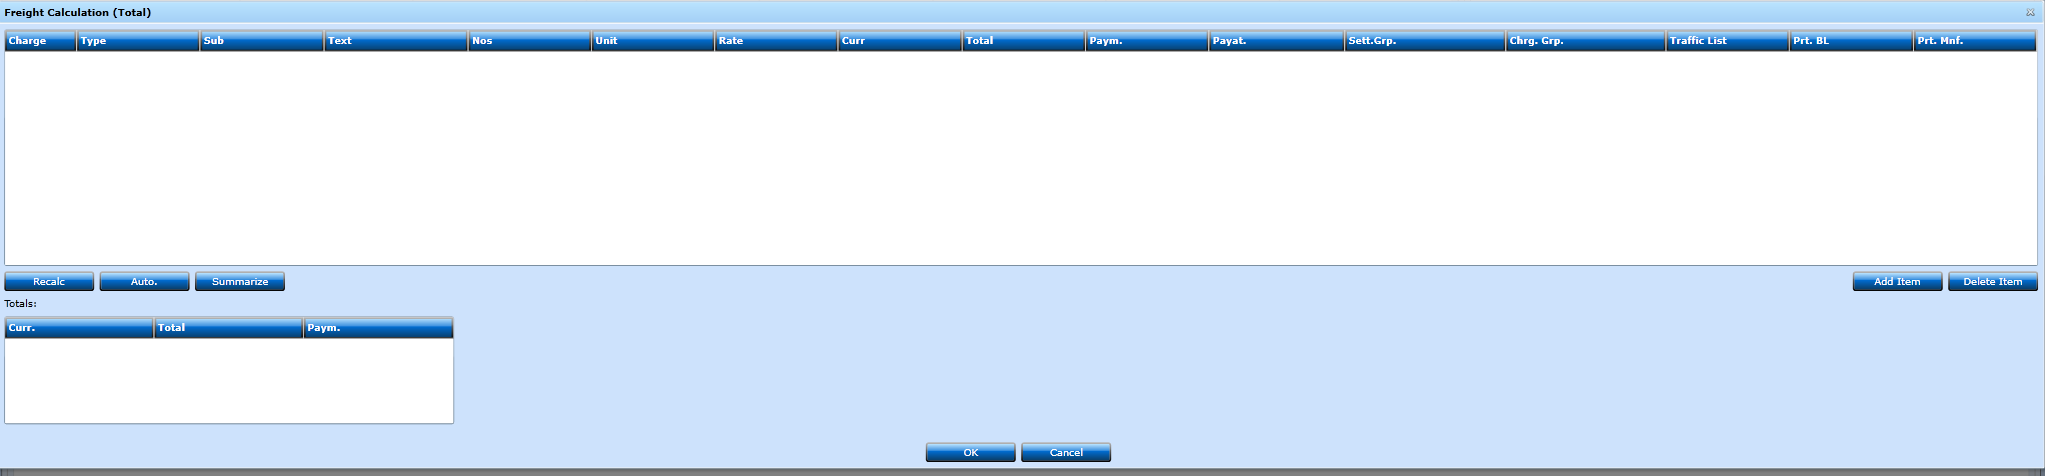
Freight Calc. Total-button
In this section you can add items and charges.
|
Select a valid Charge from the drop-down list displaying valid values from the Charges table. |
|
|
Type |
Choose from the drop-down list, or start typing the Type, and a list of values will display. |
|
Sub |
Will default from the field Subtotal in the Charge. Can be amended manually. |
|
Will default from the field B/L Text in the Charge. Can be amended manually. |
|
|
The system will calculate the number of containers from the Cargo Positions. |
|
|
Unit |
Choose from the drop-down list with available units from the Code File Unit Codes. |
|
Will default from the field Price in the Charge. Can be amended. |
|
|
Will default from the field Curr in the Charge. Can be amended. |
|
|
The system multiplying Nos Rate. |
|
|
Will default from the field Pay. Code in the Charge. Can be amended. |
|
|
Indicate where the freight is payable be selecting a valid Code. |
|
|
Will default from the field Settl. Grp in the Charge. Can be amended. |
|
|
Choose from the drop-down list with available values. If you want to create new Charge Groups press "+". |
|
|
Choose from the drop-down list with available values - Print, Summarize, None. |
|
|
Choose from the drop-down list with available values - Print, Summarize, None. |
|
|
Choose from the drop-down list with available values - Print, Summarize, None. |
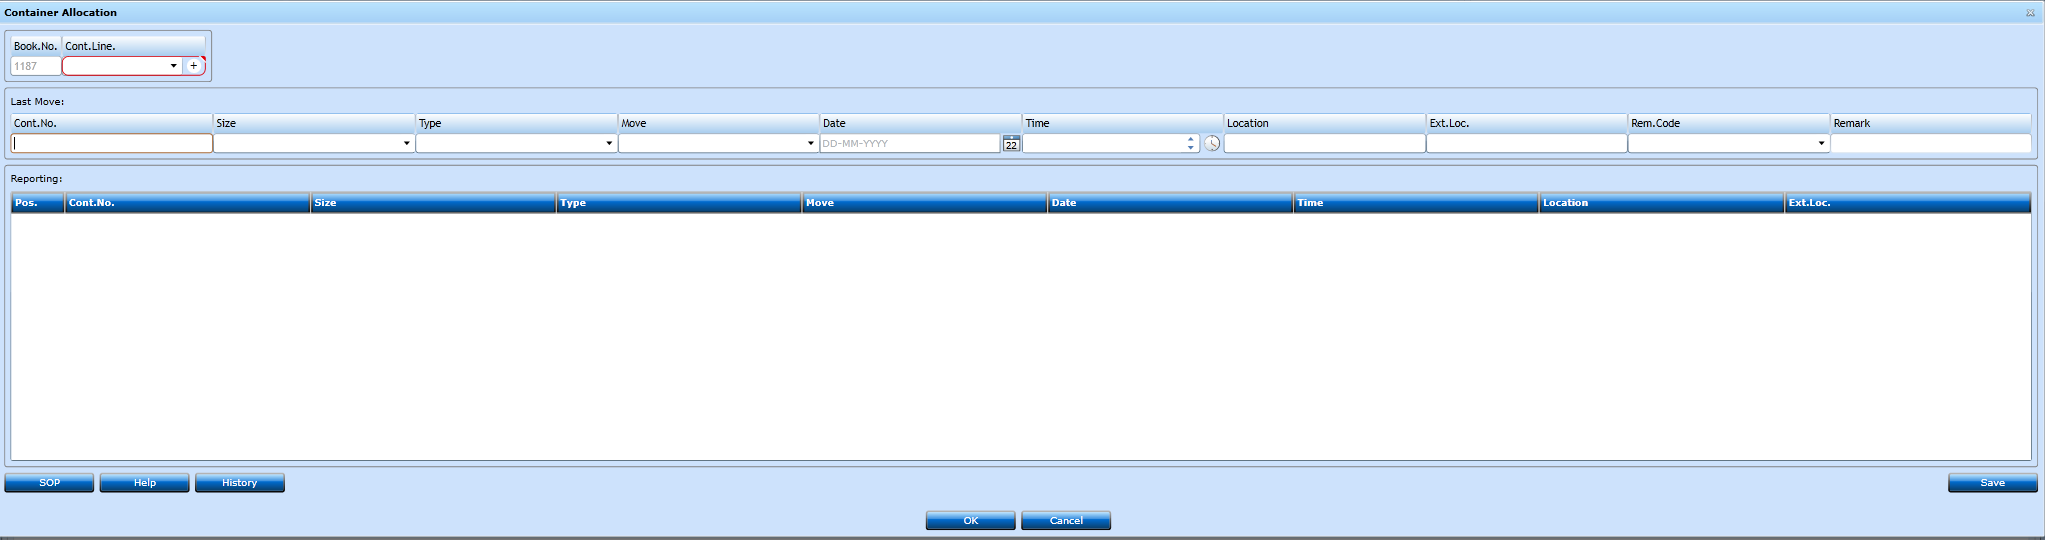
Allocate Container-button
In this section you can allocate containers.
|
Will be Auto-assigned to the number from the present Booking. |
|
|
Cont. Line. |
Choose from the drop-down list. If you want to create a new Container Line press "+". |
|
Cont. No. |
Type in the Container No. you want to Allocate. |
|
Size |
Choose from the drop-down list, or start typing the Size and a list of values will display. |
|
Type |
Choose from the drop-down list, or start typing the Type and a list of values will display. |
|
Move |
Choose from the drop-down list, or start typing the Move and a list of values will display. |
|
Date |
Insert the Date wanted or use the Calender-button. |
|
Time |
Insert the Time wanted or use the Clock-icon the choose the time. |
|
Location |
Start typing the Name of the Location and a list of values will display. |
|
Ext. Loc. |
Start typing the Name of the Location and a list of values will display |
|
Rem. Code |
Choose from the drop-down list, or start typing the Remark Code and a list of values will display. |
|
Remark |
insert a Remark for the Allocation. |
Pickup/Delivery tab-sheet
In this tab-sheet you can release containers and set a depot and dates.

|
Item No. |
Will be Auto-assigned by the system. |
|
No. |
Will be Auto-assigned by the system. |
|
Cont. Type |
Will be Auto-assigned by the system. Can be amended. |
|
Container No. |
Will be Auto-assigned by the system. Can be amended. |
|
Depot |
Choose from the drop-down list or start typing the Name and a list of values will display. If you want to create a new Deport press "+". |
|
Reference |
Insert a Reference if required. |
|
Date |
Insert the Date or use the Calender-button. |
|
Time |
Insert the Time. |
|
Terminal |
Choose from the drop-down list or start typing the Name and a list of values will display. If you want to create a new Terminal press "+". |
|
Reference |
Insert a Reference if required. |
|
Date |
Insert the Date or use the Calender-button. |
|
Time |
Insert the Time. |
|
Free days |
Insert the number of Free days that is agreed. |
|
Free days |
Insert the number of Free days that is agreed. |

Haulage tab-sheet
In this section you can add information for ordering local pick up or delivery of the shipment.
Depending on the Service Type in the Cargo Position the system will default to FCL or LCL, having slightly different input fields.
When the haulage is for FCL the screen will have following fields.
|
Line |
Will be Auto-assigned by the system for the next available line in this Booking. You can issue multiple haulages from this screen. |
|
|
Haulage |
|
|
|
Haulage Type |
Choose from the drop-down list, or start typing the Type of Haulage and a list of values will display. |
|
|
Zone |
Insert the Zone. Maximum of 4 characters. |
|
|
Haulier |
Select a valid Carrier from the drop-down list displaying values from the Code File Carrier. If missing you can create directly in the Code File Carriers pressing the "+". |
|
|
Conf. Date |
Insert the Date wanted or use the Calender-button. |
|
|
Time |
Insert the Time wanted or use the Clock-icon the choose the time. |
|
|
Remarks |
Insert remarks if needed. |
|
|
Remarks |
Insert remarks if needed. |
|
|
Party Type/Name |
Choose from the drop-down list, or start typing the Type of Party (Shipper, Customer, etc.) and a list of values will display. |
|
|
Haul Name |
Start typing the Name and a list of values will display. If no values available insert the Name. |
|
|
Contact |
If the loading address is in the Customer Register you can select a contact name from the Customer Contacts. |
|
|
Addr 1+2+3 |
When selecting Type, the Address of the Party will be inserted. Can be amended. |
|
|
Zip |
Will be Auto-assigned by the system to the Zip Code of the Party Type/Name chosen. |
|
|
City |
Will be Auto-assigned to the City of the Party Type/Name chosen. Can be amended. |
|
|
Ctry |
Will be Auto-assigned to the Country of the Party Type/Name chosen. Can be amended. |
|
|
Zip |
Will be Auto-assigned to the Zip Code of the Party Type/Name chosen. Can be amended. |
|
|
City |
Will be Auto-assigned to the mailaddress of the contact person of the Party Type/Name chosen. Can be amended. |
|
|
Date |
Insert the Date when the Container has to arrive at the address for loading or use the Calender-button. |
|
|
Time |
|
In the last section you can add the details of the container and/or cargo pressing one of the two buttons or delete cargo.

 Pressing the Add Entry-button, will open a new screen displaying the various cargo positions in the Booking.

Select the one you will issue haulage for and press OK, and the system will insert the details in the haulage tab.
![]() Pressing the Add Cargo-button will simply open a new line for manual input.
Pressing the Add Cargo-button will simply open a new line for manual input.

|
Item No. |
Links to the Cargo Section Item No. When selected, the system will copy the details from this Item No. in the Cargo section, when you use Add Entry. |
|
Choose from the drop-down list or start typing the Container Type and a list of values will display. |
|
|
Container No. |
Display the Container No. - If using Add Cargo you have to insert manually. |
Customs/Add. tab-sheet
In this tab you can insert customs information on cargo position level and additional information. Some information will be on shipment level. This information will be inserted in the Customs tab.

|
Exp. Decl. |
Currently not in use. |
|
EU Decl. |
Currently not in use. |
|
Transit |
Currently not in use. |
|
Special |
Currently not in use. |
|
Intra/Std |
Choose from drop-down list between Yes or No if shipment has to be reported for Intrastat. |
|
Ctr |
Choose from drop-down list between Yes or No if shipment is loaded in container or not. |
|
Storage |
Choose from drop-down list or start typing the Name of the place where goods are stored. If you want to create new place for Storage press "+". |
|
Name |
Insert Name from the Storage place. Not mandatory. |
|
Reference |
Insert Reference. Not mandatory. |
|
Act/Exp |
Indicate if the Arrival Date and Time is Actual or Expected. |
|
Date |
Insert the Act/Exp Date of arrival. |
|
Time |
Insert the Act/Exp Time of arrival |
|
Inv. Cur |
Select the Country Code of the Invoice Currency from the drop-down list displaying values from the Code File Countries. |
|
Inv. Amount |
Insert Invoice Amount of the Invoice Currency. |
|
Insert Invoice Date or use the Calender-button. |
|
|
Insert the Invoice No. |
|
|
Choose from drop-down list or start typing the Currency. If you want to create new Currency press "+". |
|
|
Insert the Value in the local Currency. |
|
|
Insert the previous Customs Reference if existing. |
|
|
Insert the Name of the responsible for the Customs Clearence. Start typing the Name and a list of values will display. |
|
|
Insert additional information to the customs in the 4 fields. |
|
|
Freight Term |
Same as Delivery Terms. Choose from drop-down list or start typing the Freight Term. If you want to create new Freight Term press "+". |
|
Freight Term 1+2+3 |
Additional fields for further informations regarding Freight Terms. |
|
Depot/Terminal |
Insert the Name of the Terminal/Depot. Start typing the Name and the system will display a list of valid valued from the Code File Container Locations. If the Code is not there you can enter directly pressing "+". |
|
References |
Insert the Release and Return Reference. |
|
Select the Date when the Container is ready for pick-up and the latest Date for Return. |
|
|
Insert the Hour when the Container is ready for pick-up at latest return. |
|
|
Free Days |
Insert the number of Free Days for the Container. |
|
Origin |
If Country has been inserted in the shipper details, this field will be automatically filled in. But you can amend or insert choosing a valid Code from the drop-down list displaying values from the Code File Countries. |
|
Dest. |
If Country has been inserted in the consignee details, this field will be automatically filled in. But you can amend or insert choosing a valid Code from the drop-down list displaying values from the Code File Countries. |
|
Location |
Start typing the Location and a list of values will display or choose from the drop-down list. If you want to create new Location press "+". |
|
Delivery Terms |
Start typing the Delivery Term and a list of values will display or choose from the drop-down list. If you want to create new Delivery Term press "+". |
|
Delivery Text |
Type the place for the Delivery Terms. |
Remarks tab-sheet
In this sheet you can insert text and direct it to a specific report/document.

Press the Add-button [F2] and a new line will open for input.
|
Type |
From the drop-down list you can decide in which document the remark(s) shall be printed. |
|
At |
In this drop-down list you can select a set of remarks from the Remarks table. |
|
Code |
If you select a full set of remarks from the Remarks table this will have a default. But you can amend to another value in the drop-down list displaying codes from the Remark Code table. |
|
Text |
Insert the text you want to print in the document. If you have linked from the Remarks table it will be inserted automatically. |
Invoice tab-sheet
In the invoice tab you can create Multiple Invoices, Credit Notes, Settlements, Internal Invoices and Group Invoices.
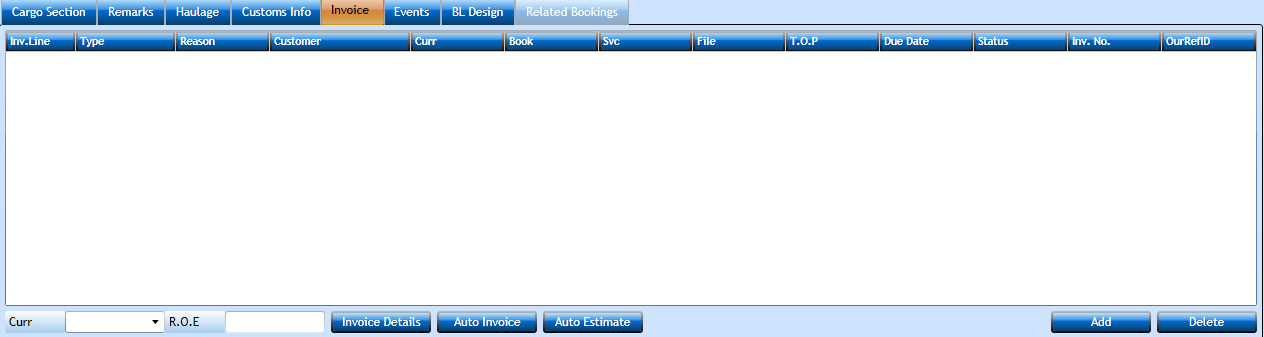
If you have linked a Quote you can simply press the Auto Invoice-button and the system will insert the invoice to the Customer. Pressing the Auto Estimate will insert
the estimate(s) in the Quote cost part. If you did not link a Quote then press the Add-button [F2] and a new line will open.

|
Order |
Will display each Invoice made in this shipment with a unique Invoice No. |
|
Select the Type of Document you wish to issue. Default will always be Invoice or Group Invoice if indicated in the Customer Register. If you need to insert an Estimate, the Type must be Settlement and status at the end of the line Estimate. |
|
|
If issuing a Credit Note you may wish to see the reason. If this is the case then select a valid value from the drop-down list displaying values from the Code File Reason Code. You may even be forced to insert a Code before issuing a Credit Note if the setting in the Allow credit with reason is chosen in the Company Register. These settings are controlled by the accounting department. |
|
|
Will display the Customer chosen. Can be amended. If you start typing the Name of the Customer a list of values will display. |
|
|
Will default from the Customer Register in the Debtor Curr. You can amend this manually choosing another Currency in the drop-down list. |
|
|
If you choose Internal Invoice in Type you can issue an Invoice from this Booking to another Booking. Insert the receiving Booking No. here, or go to the next field. |
|
|
If you choose Internal Invoice in Type you can issue an Invoice from this Booking to another File. Select a valid Service from the drop-down list, and go to the next field and insert File No. |
|
|
If you choose Internal Invoice in Type you must insert the File No. here. This will be automatically inserted if you already added the Booking No. |
|
|
The Terms of Payment will default from the Customer Register in the Debtor Terms of Payment. If allowed internally you can adjust manually. |
|
|
Will be inserted automatically when the Invoice is printed after the rules stipulated in the Service register. |
|
|
Status |
Will be Auto-assigned, but choose from the drop-down list to amend it. |
|
The invoice No. will be assigned when the Invoice is printed. |
|
|
Auto-assigned to the user logged in. Can be amended. |
|
|
Amount |
Will display the Amount from the Invoice Line in the Local Currency. |
|
Curr. Amt. |
Will display the Amount from the Invoice Line in the used Currency. |
|
VAT Amt. |
Will display the VAT Amount in the used Currency. |
|
VAT Curr. Amt. |
Will display the VAT Amount in the Local Currency. |
|
Show PDF |
Can only be used if the link to EDI Invoice is established. |
Now press the button 

Now you can insert the Invoice Lines by pressing the Add item-button.

A new line opens for input.

Depending on the creation of the charges the system will now insert the default values from the selected Charge. You can amend each field manually if needed.
Please refer to the Charges Calculation Type section for explanation of the setup.
Press Add Item to insert another line if needed, or OK to return to the Invoice header. While in the Invoice tab sheet press the Print-button and the Invoice will be printed.
Events tab-sheet
In the Events tab you can see the events or Manual Fire Events. Can also be used to upload documents.
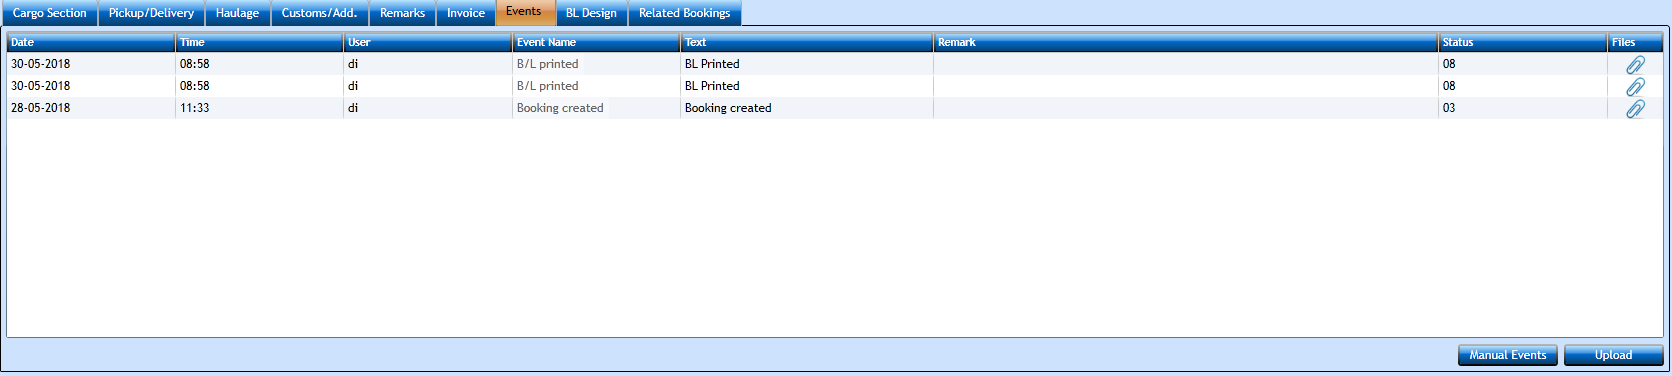
The events can be configured through the Event System.
|
Date |
Will display the Date of the Event. |
|
Time |
Will display the Time of the Event. |
|
User |
Will display the user id of who did the Event. |
|
Event Name |
Will display the Event Name. |
|
Text |
Will display a short description of the Event. |
|
Remark |
Here you can enter a Remark in free text. |
|
Status |
Will display the Book Event Status Code. |
|
Files |
Here you can upload a file to the specific event if needed. |
|
|
|
You can also press the Manual Events-button.
Here you can fire a manual event.
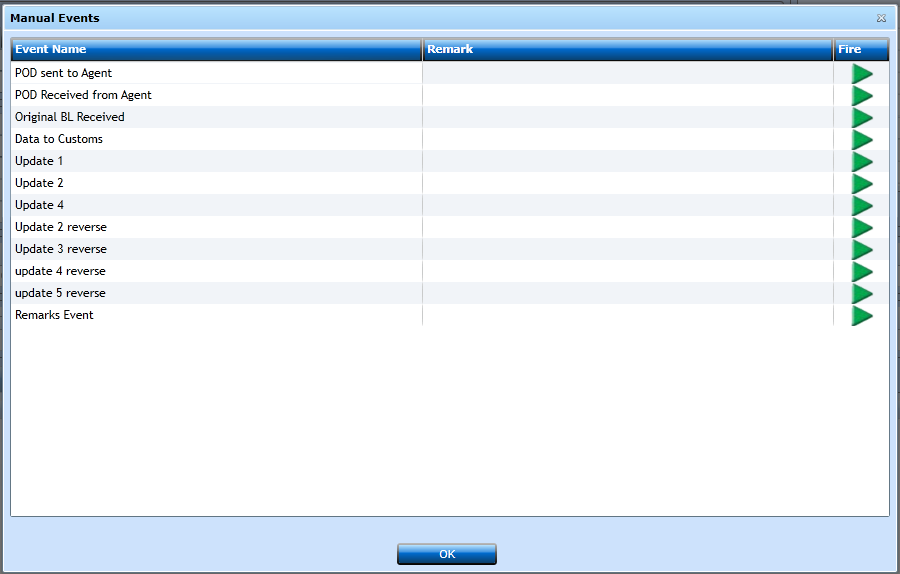
Press Fire on the event you want and you will see this message when done.

The manual Event will be visible in the Events.

BL Design-tab sheet
In this tab-sheet you are able to see the B/L informations, and amend these.

Press the Summary-button to get an overview of the informations.
|
Marks Nos |
Will display the Container No. and the Seal No. for the containers in the Booking. |
|
Pkgs |
Will display the number of packages in the Booking. Only used for LCL shipments. |
|
Cargo Description |
Will display the description of the goods loaded in the containers. |
|
Gross |
Will display the Gross Weight. |
|
Volume |
Will display the Volume. |
Related Bookings tab-sheet
In this tab-sheet you are able to see if there is any related bookings to this Booking.
